DIY Fireplace Makeover
Try this DIY fireplace makeover tutorial to give a dated fireplace and mantel a new look. Simple changes can make a room look completely new.
*This post contains affiliate links.
Our DIY fireplace makeover post has been in the works for months. As with lots of projects around our house we like to start them at the spur of the moment. Like during the holidays. When there are a million other things to do, know what I mean?
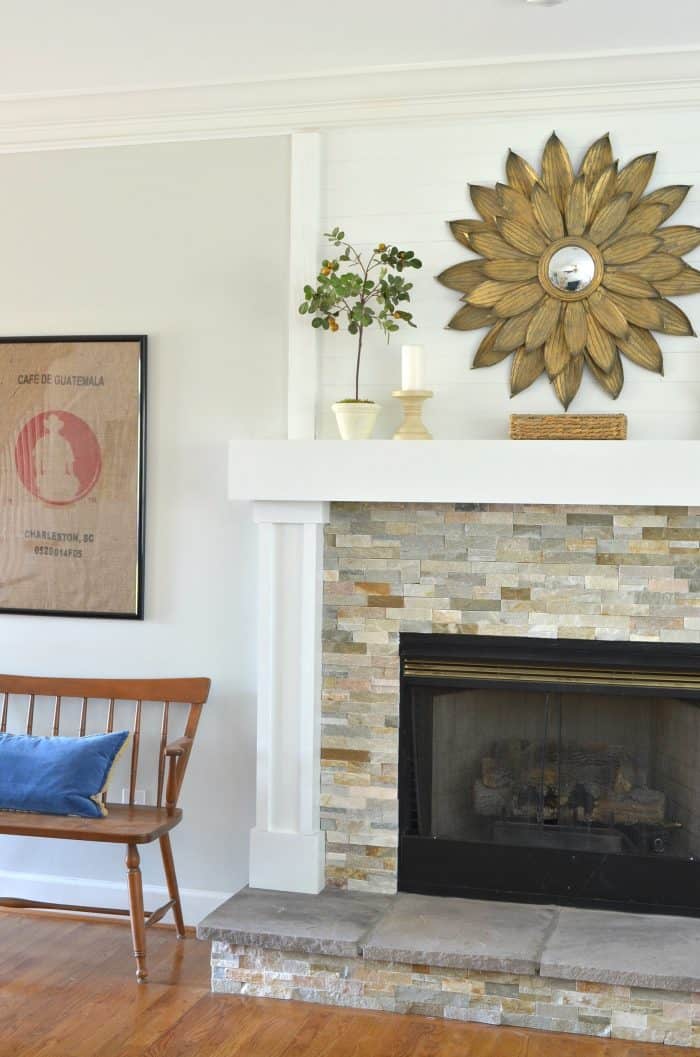
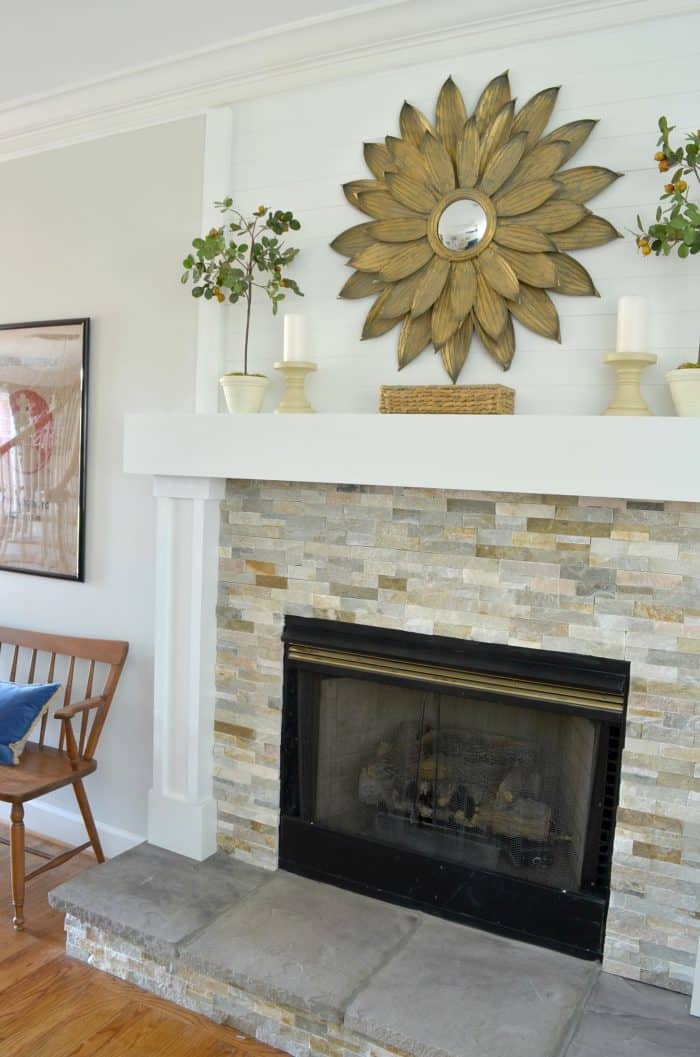
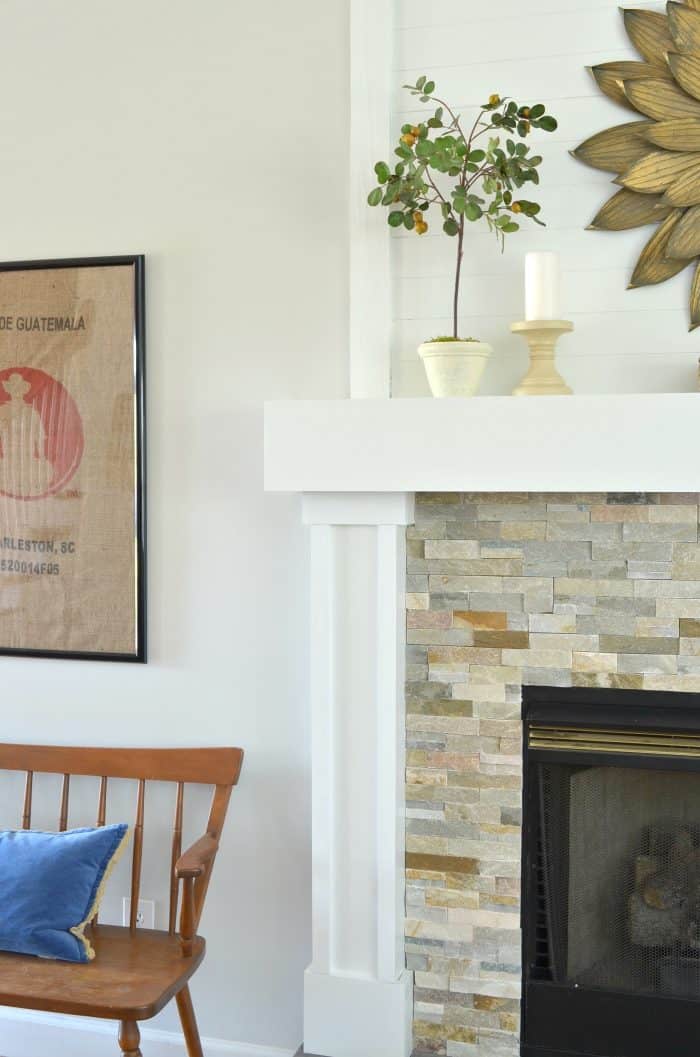
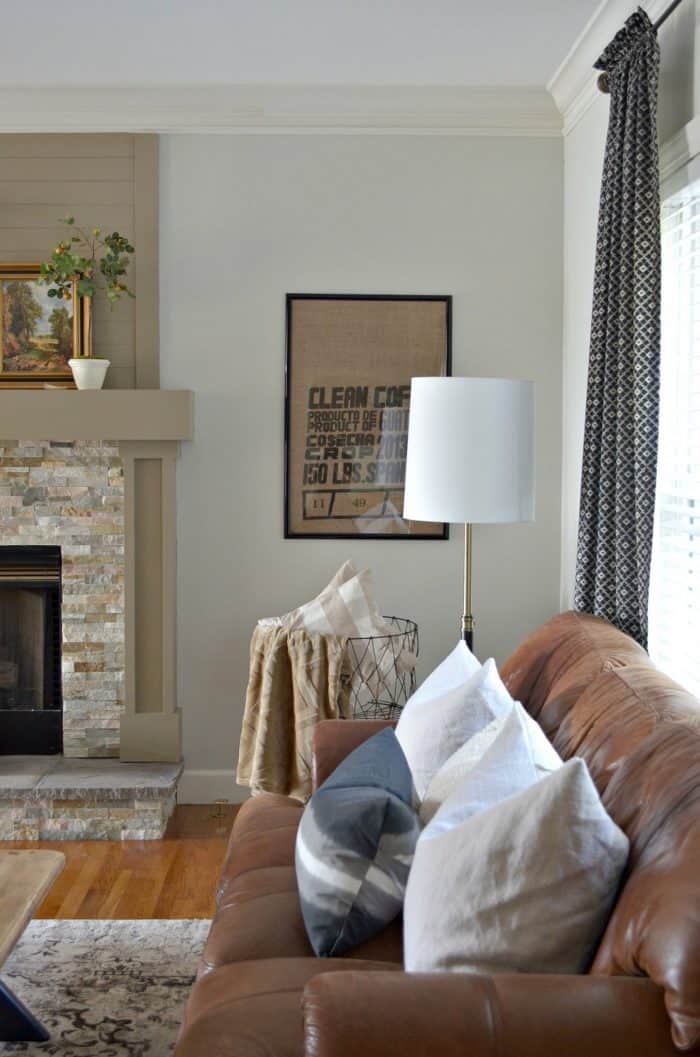
I would like to say, we did love my fireplace before. We had already completed a mini fireplace makeover on it by adding the wood plank above the mantel so I knew I wanted that to stay.
There was one problem though, we never actually used the fireplace to warm the house in the winter. It is a gas fire and it smelled bad every time we turned it on.
So bad that it was impossible to use.
I kept putting off replacing the insert because I knew we would have to redo the tile and I wasn’t ready for such a messy project.
Two days after Thanksgiving we decided we didn’t want to miss another winter with our fireplace not working.
There is one thing I know about my handy husband, he loves to demo things. Sometimes at the mere mention of a new project I turn around to a demo site. I made him promise me to stop doing that unless I was totally prepared to do my part.
I love home decor projects but I hate a messy house.
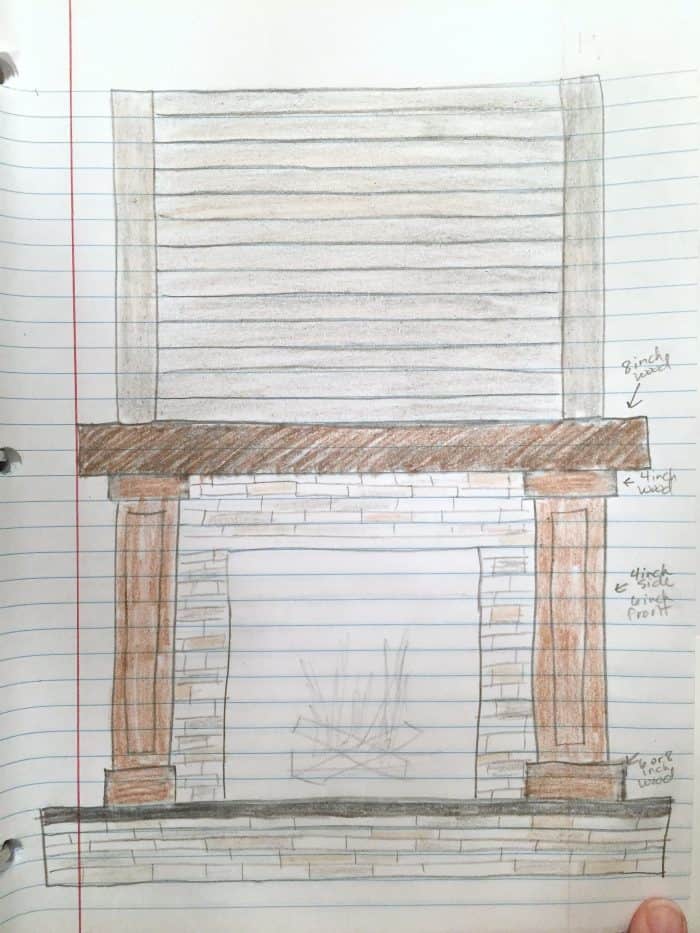
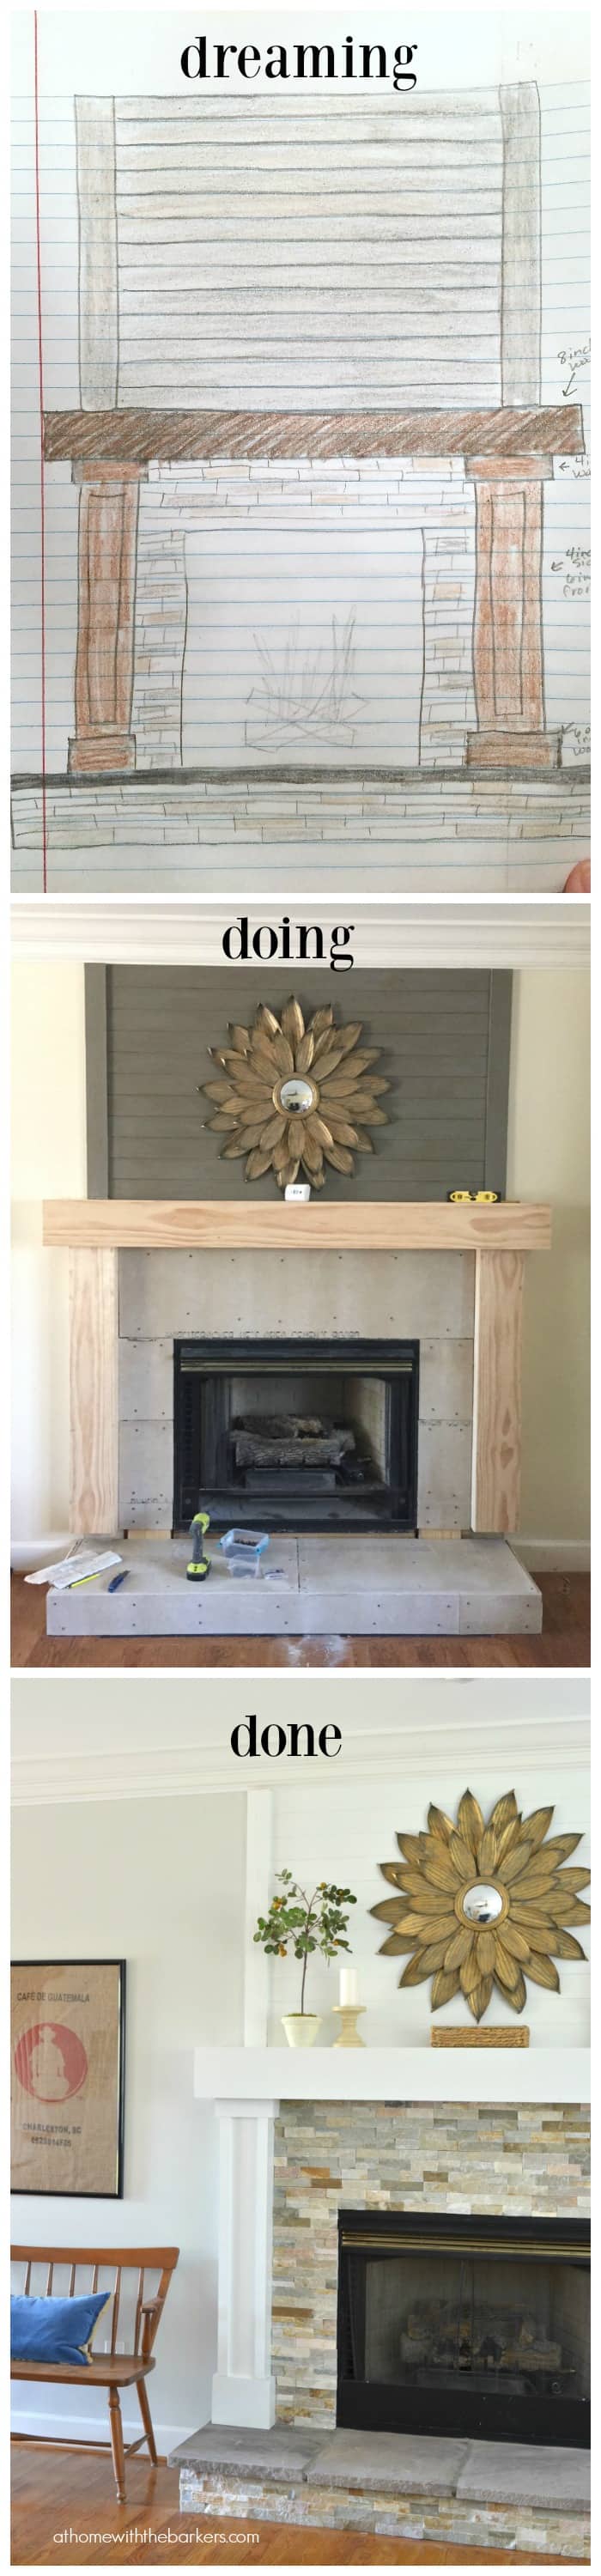
So I went to work drawing for him on paper what was in my head. I colored it in so he could have a more visual of what I was thinking. My original fireplace makeover ideas included possible stained wood so that is what is in the drawing. In the end I went the painted route.
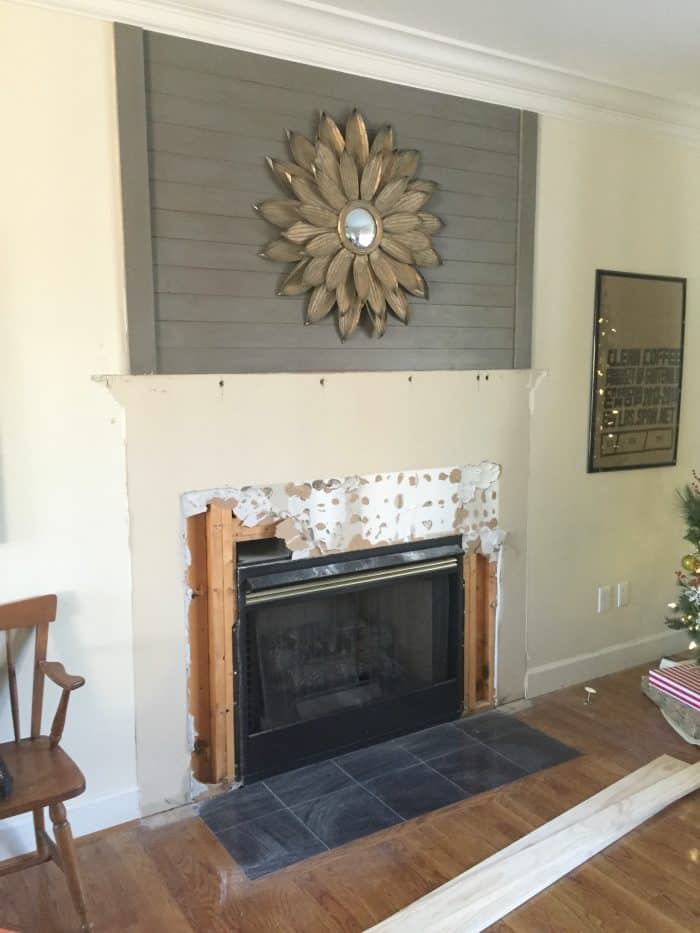
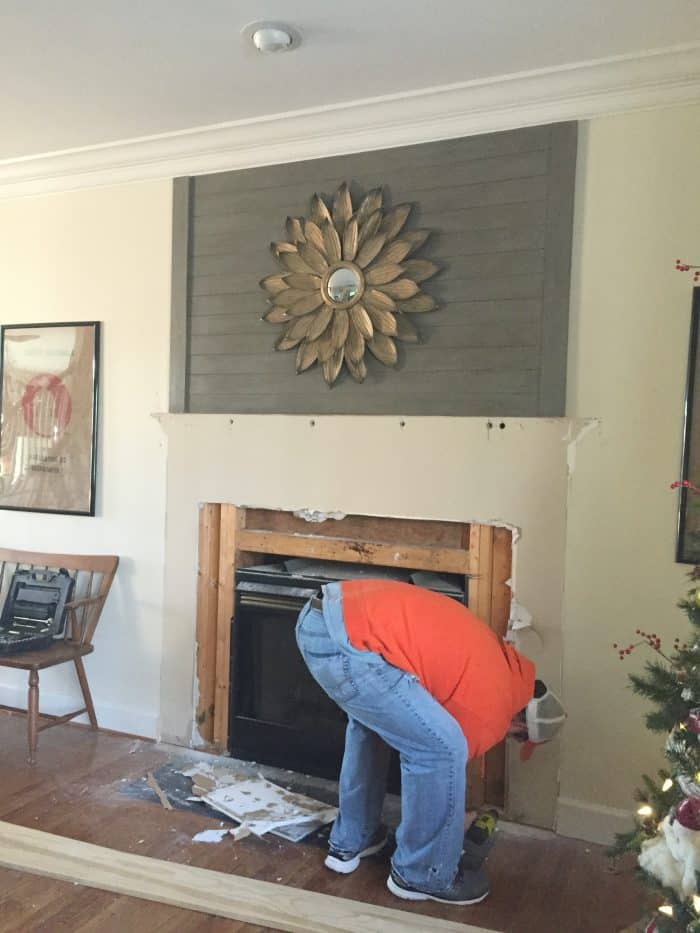
Then it was demo time… YES we did the demo for the fireplace makeover before we bought any supplies.
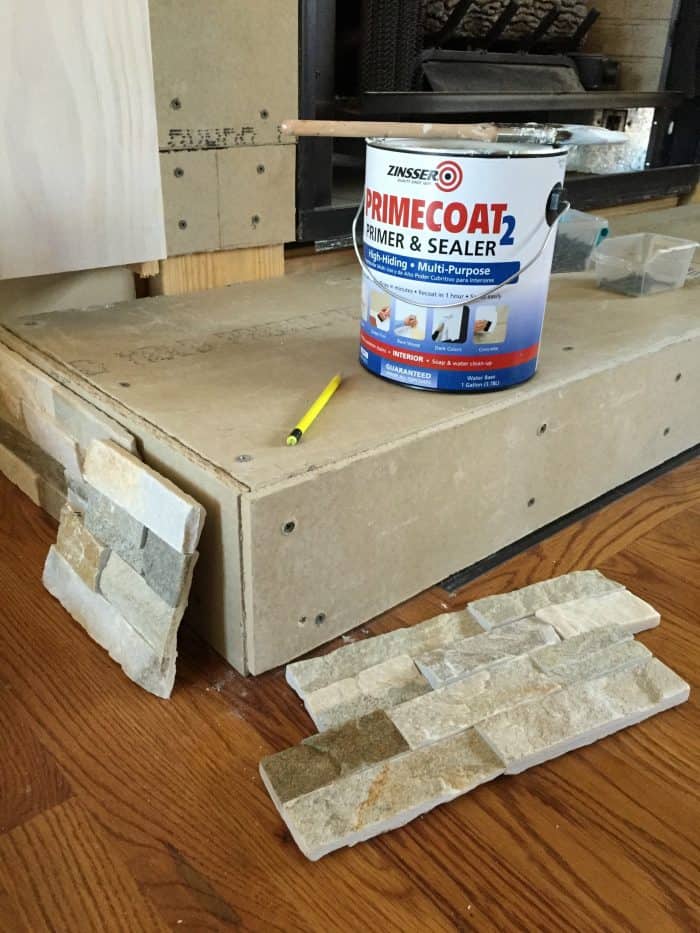
BUT I had looked around online and had pretty much decided on the tile and stone. Ray brought the samples home for me to see in our house and I ended up choosing the exact one I thought I would.
Supplies to BUY:
- Hearth Stone from Boral Brick
- Natural Stone Wall Tile
Problems to SOLVE:
- Smelly gas. You won’t believe this! The gas line was loose. Ray repaired that and no more smell. Still, there was no turning back at this point.
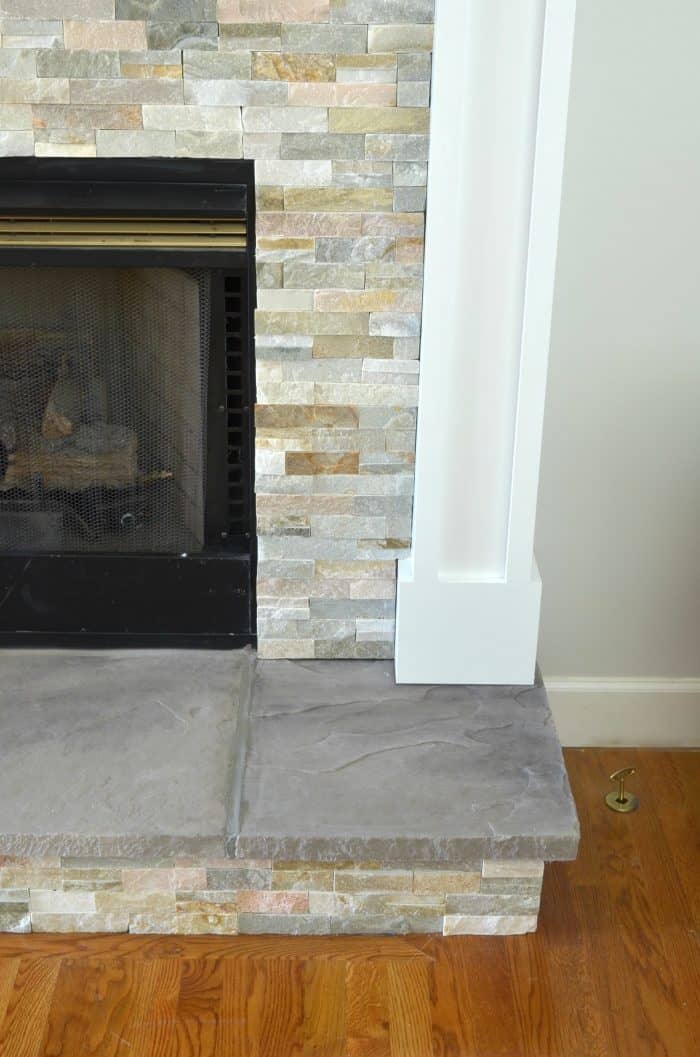
- Do away with the black tile on the floor.
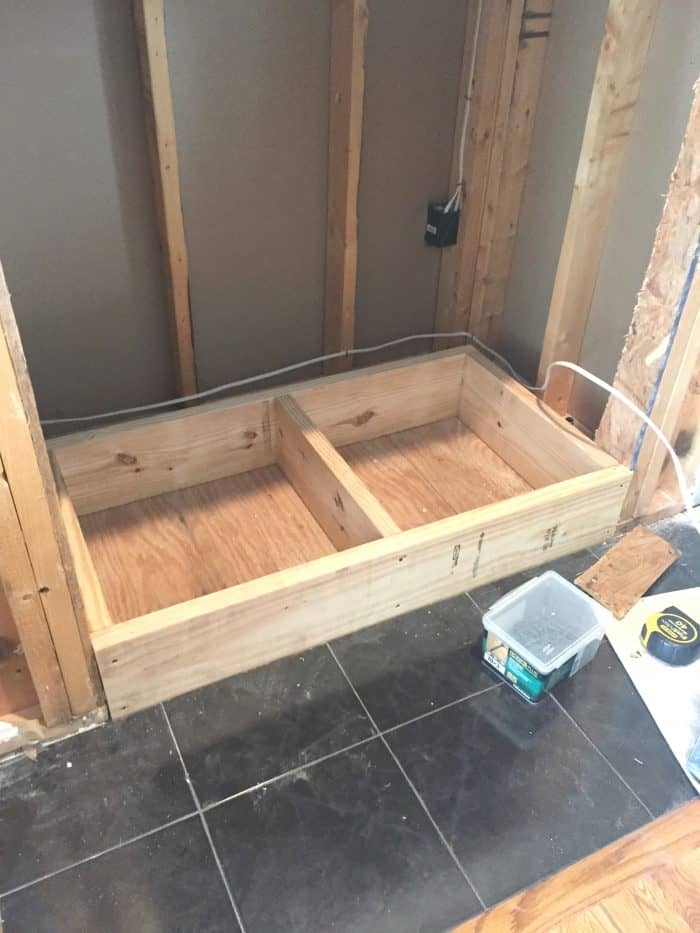
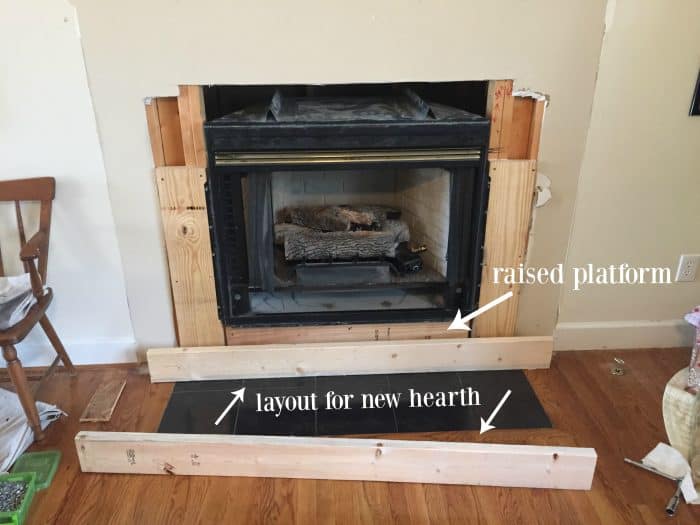
The easiest solution was to add a hearth over it. To do this we had to raise the fire box insert by building a little platform for it to sit on. This caused everything to shift up a few inches requiring us to remove the bottom wood plank we had previously hung above the mantel.
Ray was very careful here not to damage any of the other boards. We also cut away the drywall that was under the black tile to give more room for the fire box to fit.
Handy TOOLS to have:
Time saving TIP:
When we were deciding how much to raise the fire box we took into consideration the tile size. We wanted to make sure we made the hearth the exact size to fit one 6 x 12 tile with out cutting the height, only the width at the ends.
Maybe one day I will share how to tile but that will be a post all on it’s own. We have tiled floors and kitchen backsplashes and now a hearth. I will say this was the easiest one of them all. I hate to tile and grout. It’s my least favorite DIY.
For the hearth build, we created a platform out of 2 x 6 boards. You will need to determine the length and width depending on your own needs. Since we knew we wanted to use the 12 x 6 tiles without having to cut them we chose the 2 x 6 boards. I do not have a photo of the box before the cement board went on. It looked the same as the raised box the fireplace insert will sit on.
While the interior box had one center board the hearth box had two boards evenly spaced. The hearth box was securely attached with screws to the fireplace box. Then we covered the hearth box with cement backer board. This is similar to sheetrock but made of cement. It is what you must use under tiles.
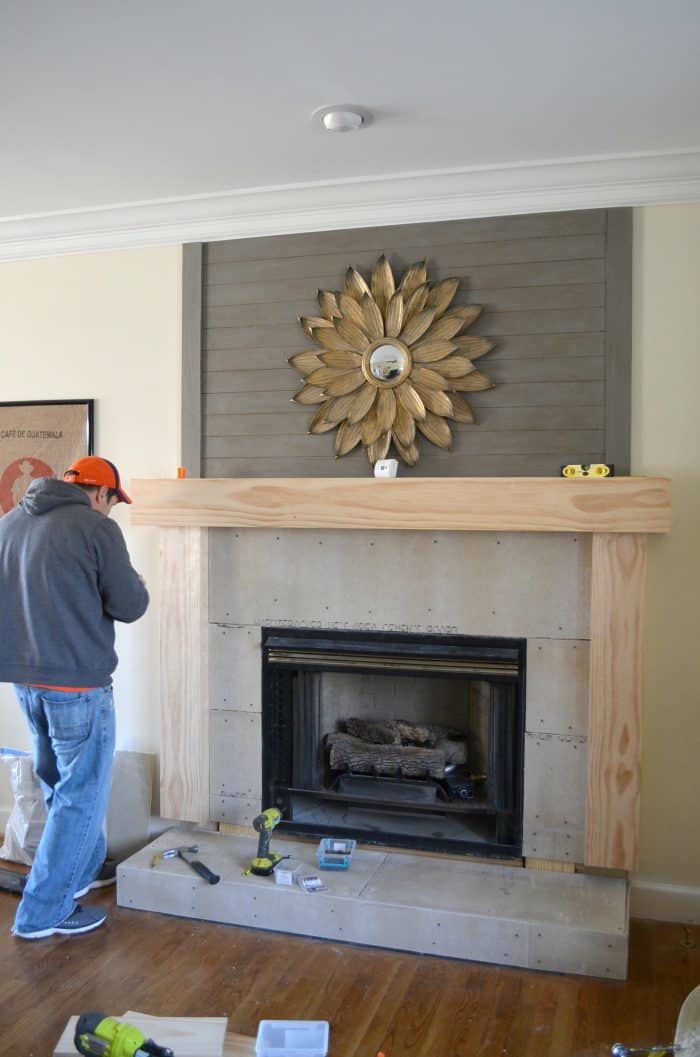
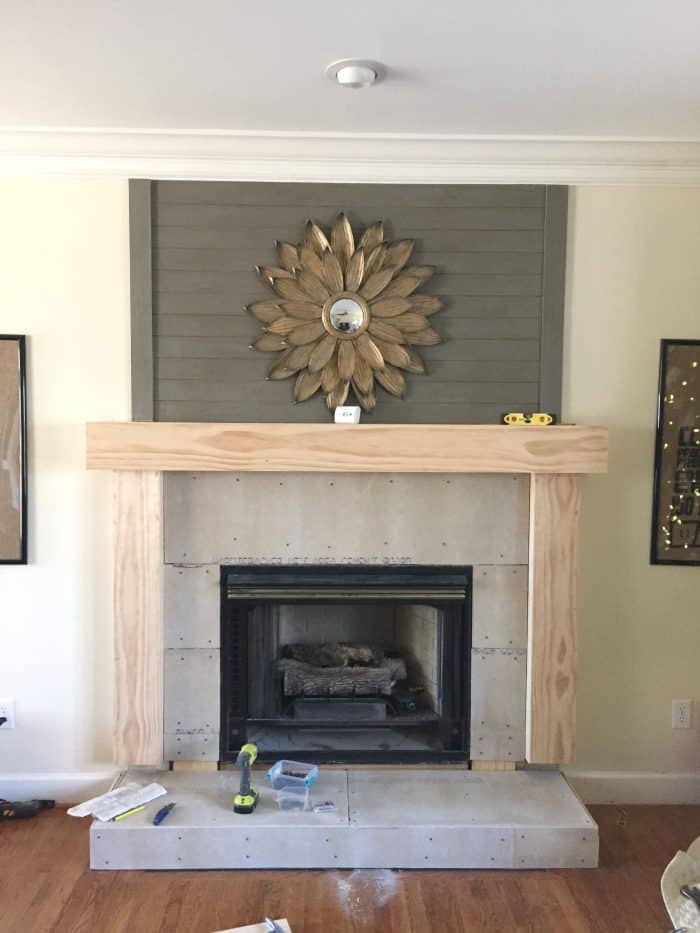
I am so happy with how this fireplace makeover turned out. Ray did a great job with his building and craftsmanships as always. I can’t wait to show you the patio tables he is currently working on. He has such a demanding day job, I am thrilled anytime I can get him to build me something.
Now I am looking forward to decorating the mantel for fall. I’m working on gathering some of my blogging friends together to share with me.
**UPDATE: Family Room Makeover and new mantel paint color**
Here is a fun graphic to see the DIY Fireplace Makeover through our dreaming, doing and done!
Pin it for reference later.

Thank you so much. We love it too. I’m not sure I understand what you’re missing?
This is how we added the “shiplap” look above the fireplace in stage 1 process. https://athomewiththebarkers.com/wood-plank-mantel-makeover/
This post is stage 2 of the makeover. https://athomewiththebarkers.com/diy-fireplace-makeover/
I love the fireplace you did. We are adding a new addition and want something almost exactly like this. I know you provided a link for a similar design for the mantel and surround and wall with the ship lap. Would you be able to provide more specific information on the designed you did?
Thanks so much!
We have always used it under any tile or stone. It is the best thing to protect the tile and keep it safely in place. It’s just what we recommend.
Hello! We are in the process of redoing our fireplace can you tell me was the backer board a necessity? Or could you just do plywood under the stick on tile?
Neither actually. We just kept the tile as is and lined them up. It’s not perfect but looks completely fine.
Hi! We are in the middle of this project and I have also, believe it or not, chose the exact same tile. Did you purchase the corner pieces for the stone or did you find cutting them at 45° was an easy option?
Tha is for getting back to me I have a couple more questions for you.
1. What size wood did you use for the mantle and side pieces underneath the mantle?
2. Does the mantle board rest at the top of the pieces that go down the side of the fireplace?
3. Did you place the hearthstones before doing the stone on the fireplace?
4. How highly is the mantle’s bottom from the opening of the fireplace?
Sorry for all the questions just getting started. Thanks in advance.
No need to attach to the floor. You are right, we screwed the hearth platform box to the fireplace riser box. It was perfectly secure. Thanks for asking, I’ve added that detail to my post. Happy to answer more questions if they come up. Sometimes I’m not the best at adding those details to a post. ~Sonya
Hello my wife found your fireplace remodel and we both love it. Can you tell me how you secured the platform to the floor? Or is it just secured to the build up you did underneath the fireplace.
Thank you! We did the stacked stone under the hearth first, the hearth stones next then added the stacked stone tile surround. So yes, your recommendation is correct. That way the surround tiles sit on top of the hearth. Are you doing a fireplace makeover?
Love the look..Did you install the stacked stone first or the hearth stone..It was recommended that we do the heart treatment first as we have to have about 1/2 lippage , and then build the stacked stone ..Just curious as to what was installed first. Thanks
Thank you! Yes, we added the tiles just the same as we would with real wood.
Loved your finish product! If it were a wood plburning stove do you think the Tiles would remain adhesed ? Or pop off with heat ? Will be redoing ours (wood burning) & looking for advice!
Yes, sort of. It’s my interpretation of it and you can see the tutorial here. https://athomewiththebarkers.com/wood-plank-mantel-makeover/
This is so beautiful! Is that shiplap above the mantel?
How did you build the hearth platform?
We built ours using 2×6 so that we could use one strip of 12×6 tile. That way there would be no unnecessary cutting of the tile.
Beautiful job! Could you tell me how high the hearth is from the floor? WAS the wood frame using 2×6 or 2×8 wood?
You have given me great inspiration. Your before looks like mine with the firebox sitting on the floor. Mine vents directly to the rear of the firebox so I am wondering about raising the firebox and not compromising the venting. We also have a large unattractive 2.5′ deep opening level with the mantel that I want to enclose. It currently holds a 70″ TV. I love your stone and new hearth. Great job!
The backer board was screwed directly to the wood. That’s it.
Hi! Thank you for sharing this project. After building the frame, all you did was apply the backer board? Did you add cement or anything between the frame and backer board? Thanks!
Here are some options for the hearth stone. https://boralamerica.com/stone/cultured-stone/hearthstone/csa-hs-marsh
What stone did you use for on top of the hearth? I can’t find it through the link posted. Thank you
Sorry, I didn’t have any other ideas in mind. This was what I wanted from the start. I would ask around at a tile store that specializes in it. Honestly, the contractor may not be exactly right. I’m just not sure.
Hi, this is gorgeous and the exact stone I originally chose for our in-progress fireplace remodel. Our contractor advised against the quartz stone due to having a wood burning fireplace. He believed it would stain over time and the smoke and soot would be unable to be removed. It makes me sad because I am just drooling over all of the beautiful stone fireplaces on the interwebs. I can’t seem to find a tile that lives up to this. Do you remember what your other choices were? Thanks!
Hi. So i am lookig to do a similar makeover to our fireplace but I am teying to figure out how to cut the stone??? Do you need a wet saw??? What did you use?
Thanks!
We thought they were very easy to work with. You will of course need to cut some but the way they fit together makes it very hard to tell each one from the other.
We’re the stones easy to work with? My husband is afraid they won’t cut easily.
Yes, we did use backer board. I forgot to mention that in the post. I’ll be sure to add it in.
Great job! Did you use cement board or just drywall around the frame of the hearth?
How did you do the large pieces – that isn’t shown
Sure, I bought those from Lowe’s. They are the Desert Quartz Ledgestone Natural Stone Quartz Wall Tile. I have edited the post to include links. Good Luck with your makeover.
We are doing something similar to our fireplace. Where did you find your stone?
Stunning!
Thanks Donna. Good luck with your remodel.
Thanks Paula! It was a labor of love.
Thanks so much! Love that mirror too.
Sonya,
This turned out gorgeous. I love the stones you picked out for the fireplace. I am drooling over the mirror as well. LOL
Looks TERRIFIC, wow! Now I want my son to re do our old red brick fireplace! Great inspiration! ??
Beautiful job!!
Beautiful job!!! We have a brick fireplace with an insert and we are trying to figure out a remodel for it. Love the colors and textures you chose.