DIY Beverage Bar
How to paint a raw wood stock cabinet from home depot. Created a beverage bar for our home.

DIY Beverage Bar
I have been very excited to share this project with you. The kitchen makeover has been a big project and this DIY beverage bar is almost an add on to the kitchen one room challenge, making it sort of a two room challenge.
I’m sharing all about the painting in this post BUT you can see the complete beverage bar building tutorial HERE.
I have been so pleased with the Americana DECOR Chalky Finish paint and I use it whenever I can.
We have this space under our stairs that has always been a catch all mess. As with most home projects, I have the grand ideas and my husband gets to implement them. Here is the space before.
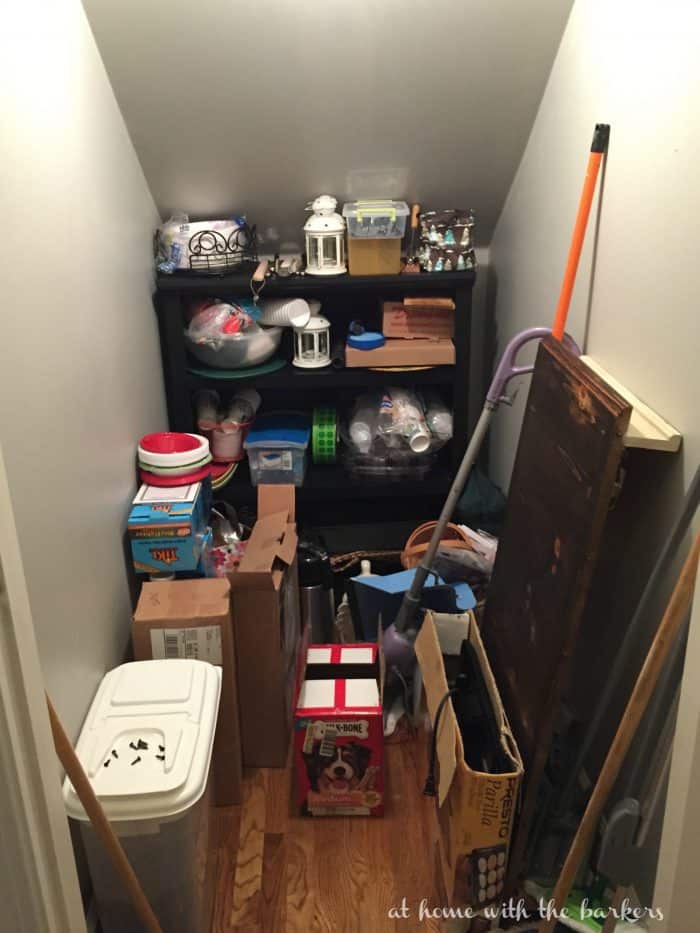
YES, it was a real mess.
It didn’t take very long for it to turn into a great spot for us. You can see the DIY Beverage Bar is going to work perfect with the stock cabinet and small fridge.


To build in this space we bought a stock kitchen cabinet from Home Depot. I knew I wanted to paint it black and Carbon is the perfect shade of black.
Before you paint I would do a quick sand over the wood because it does come a little rough. Then wipe is down with a damp cloth before you get started.

You can see that we cut a piece to nail to the bottom of the cabinet as a foot kick. I painted it carbon as well. This paint can be waxed but I have come to really like using the Soft Touch Varnish. It is a great finish and protects the paint VERY well. I have also just finished painting my kitchen cabinets with this paint and will have the full reveal on the blog on Thursday.


Now I must go finish getting my kitchen completed.
**How to build the beverage bar
We bought ours at IKEA but if you aren’t near one these are basically the same https://rstyle.me/+xfH1dPuBeD1sVhJKyPd9hA
Can you tell me where you got the brackets for your shelves? I love the white! 🙂
This would look great in a bathroom. Good luck with your DIY.
Your coffe bar came out great, I’m working on a tea bar (coffee never took for me) I was wondering where you found the three tier galvanized tray. Thanks for your time
When we built the wall we left the back behind the fridge open. You can see it all here https://athomewiththebarkers.com/how-to-build-a-beverage-bar/
Thank you! We do not have issues BUT if you noticed our space was that long odd shaped closet so when we built the wall we left the space behind the fridge open. If I pull the fridge out right now you could crawl in there, if that makes sense. Good Luck with your pantry, sounds amazing. ~Sonya
I love this space! We’re in the process of building a home with a butlers pantry. We’ll be installing a beverage fridge as well! Did you run into any issues installing a freestanding rear venting fridge under/next to cabinets? Does it vent well?
Here is the cabinet we bought. This is my affiliate link. https://rstyle.me/n/c4xh3bb5ckf Also, not sure if you saw the building post as well. https://athomewiththebarkers.com/how-to-build-a-beverage-bar/
Hi! I love this and am trying to recreate it for our TV room. What stock cabinet did you get? I’ve looked at Home Depot but haven’t had any luck finding it:(.
This looks great! Did you simply place the fridge in the cabinet after removing the door? Or, did you also remove the back panel?
Thank you so much! This is the cabinet we bought for bar. They will come in different sizes so it will depend on how much space you have. Ours was 15 inches. Good Luck!
Hi Sonya I love love this project! Its great, truly I love your site its an inspiration. I am going to order those rose gold knobs off the affiliate link. Im really curious what cabinet this is at home depot. Or if there is any place you suggest purchasing a stock cabinet.
Thanks in advanced keep up the great work!
I have the Frigidaire 22 in.(the link to it is in the post) and we like it very much. I just checked and we keep ours at 41 degrees and our drinks are great. Sometimes the one’s on the bottom back shelf get a little ice. I clicked the buttons and it will lower to 36 degress. We have had ours around 2 years and we love it.
I was wanting to know what brand of refrigerator you are using, everyone I find with glass doors will not keep the sodas cold enough. They wont go lower than 45 degrees. Could you please let me know your experience.
Linda
Can you tell me what stock cabinets you bought. Is this just one cabinet that you took the other door and drawer off or is it two separate ones. Thanks so much!
We’re thinking of doing something similar. Very attractive. Not ovedone. Just the essentials. My question is your mini beverage cooler. Do you hear it running, does it produce heat? Can you tell me the brand? Thanks.
Thanks so much. The hardware is actually rose gold and here is an affiliate link to the pull It’s by hickory hardware cottage line. https://amzn.to/1XCb1Wc
So beautiful! You’ve inspired me to update my 80’s wet bar!! Thank you! Is your knob and cabinet pull in gold? If so, where did you purchase it? Thanks for your kind reply!
Does the frig work well? I have a similar space but can’t find a frig that keeps beverages cold and looks good.
Which cabinet did you buy? I love that it fits your fridge perfectly. Do you know the dimensions of the cabinet? Thanks! This looks fabulous!
NO we did not stain the wood. If you buy the butcher block I would NOT add stain. We purchased the Oak Butcher block from IKEA and left natural. We use wood conditioner on it. You can see more about the counter top here https://athomewiththebarkers.com/how-to-build-a-beverage-bar/ and the wood conditioner we use here https://athomewiththebarkers.com/stripping-paint/
What color of stain did you use on the wood countertop? I’m assuming you stained it.
Do you know the type of wood used in the butcher block?
My hubby and I are in a project similar to yours. I cannot commit to a stain to use on our bare oak plank top.
I’m paralyzed in choosing a stain.
I love your color combo. It is what I have. Black cabinets with wood countertop.
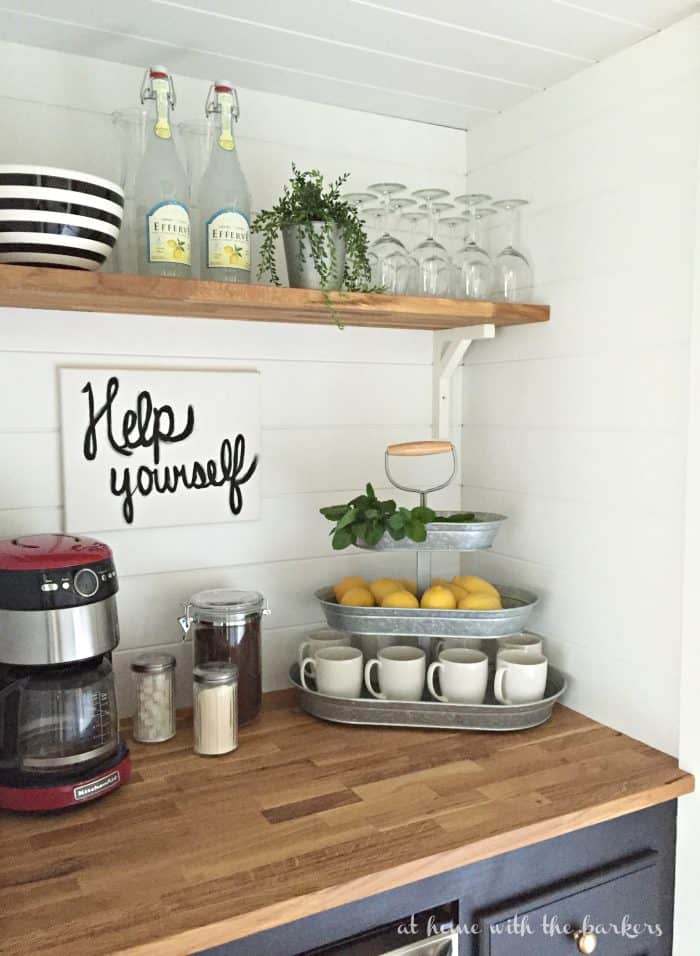
I bought the tiered tray last summer at Sam’s Club.
I love it. I want one of the 3 tiered thing with the lemons. Where did you get that or did you make it?
We decided to buy the butcher block longer than we needed because it was much more budget friendly than custom cut ones. You will need to use a NEW sharp blade for fine cuts. Put a line of painters tape then draw your cut line over it, this will also help. The butcher block looks great on the cut edge and once sealed like the top it all looks the same. Hope this helps. ~Sonya
Was it hard to cut this countertop??? Did it chip or splinter at all?? I looked it up on IKEA’s website and it seems to only come in 8 foot lengths and I don’t need that much…. Also, what did the inside look like once you did cut it?? Would I need to have walls on either side once cut or would it look okay free standing (like on a island)??? Thank you!
It came from Sam’s Club last summer.
Love the tiered tray, where did you find it?
Thank you, Lori
Thanks Vicky, I bought it from Sam’s Club.
This is great@ Where did you find the stand that holds your mugs?
My husband added the receptacles himself. This is not something we are experts in enough to share a how to but it is a simple solution for a local handyman.
How did you plug the fridge into the wall? I have a space that would be perfect but not sure how i’d wire the fridge just yet.
Thank you
Thanks so much. My husband added an outlet. Here is a link for the “how to” post. https://athomewiththebarkers.com/how-to-build-a-beverage-bar/
That is a really great use of space! I love what you did with it. Does the fridge plug in behind there somewhere? Was there an existing outlet or did you have to add one?
Where did you find that adorable stand that holds your mugs? That is exactly what I need! So good use of your space. Thx Kim
I bought the 6 foot butcher block from Ikea. I did measure and cut.
Did you buy the butcher block separate from the cabinet? And did you just measure the space and it happened to be something they had in stock? I’m wanting to do something like this for our home theater but free standing. Thanks for your help!
Where do you get the Soft Touch Varnish?
Thanks SO much!
The fridge is a Frigidaire and we bought it at Home Depot.
Beverage bar is perfect,such a great idea,can’t wait to see the rest.
Looks beautiful!! Where did you get the fridge from?
Oh my Sonya I’m so jealous of your fabulous coffee bar complete with beverage fridge. What a perfect use of that space. I’m crushing on that galvanized tiered tray too!
Fantastic use of under stair space! Love it.
That is exactly where this space is, between our dining room and kitchen! The soft touch varnish is so great. It goes on white, sort of like mod podge but dries clear AND it can be used on outdoor painted pieces and will not chip! You should try it.
What a great use of space, I know you will enjoy it. We had the builder of our last house do this under the stairs between the dining room and kitchen. It was so helpful for parties to have all the beverages in one area. Great work and can’t wait to see the rest of your kitchen.
Oh, and can you tell me more about that soft touch varnish?
Thanks so much! We are enjoying it.
I was really pleased with how great the butcher block did look with the black paint!Thanks!
Thanks Katie…we are pretty excited this space!
OMG! Great job and love the color you choose!
Such a great use of space! The dark paint looks amazing with the butcher block top.
Ah this is such an awesome little nook! I love the color you chose. It pairs beautifully with that wood top 🙂