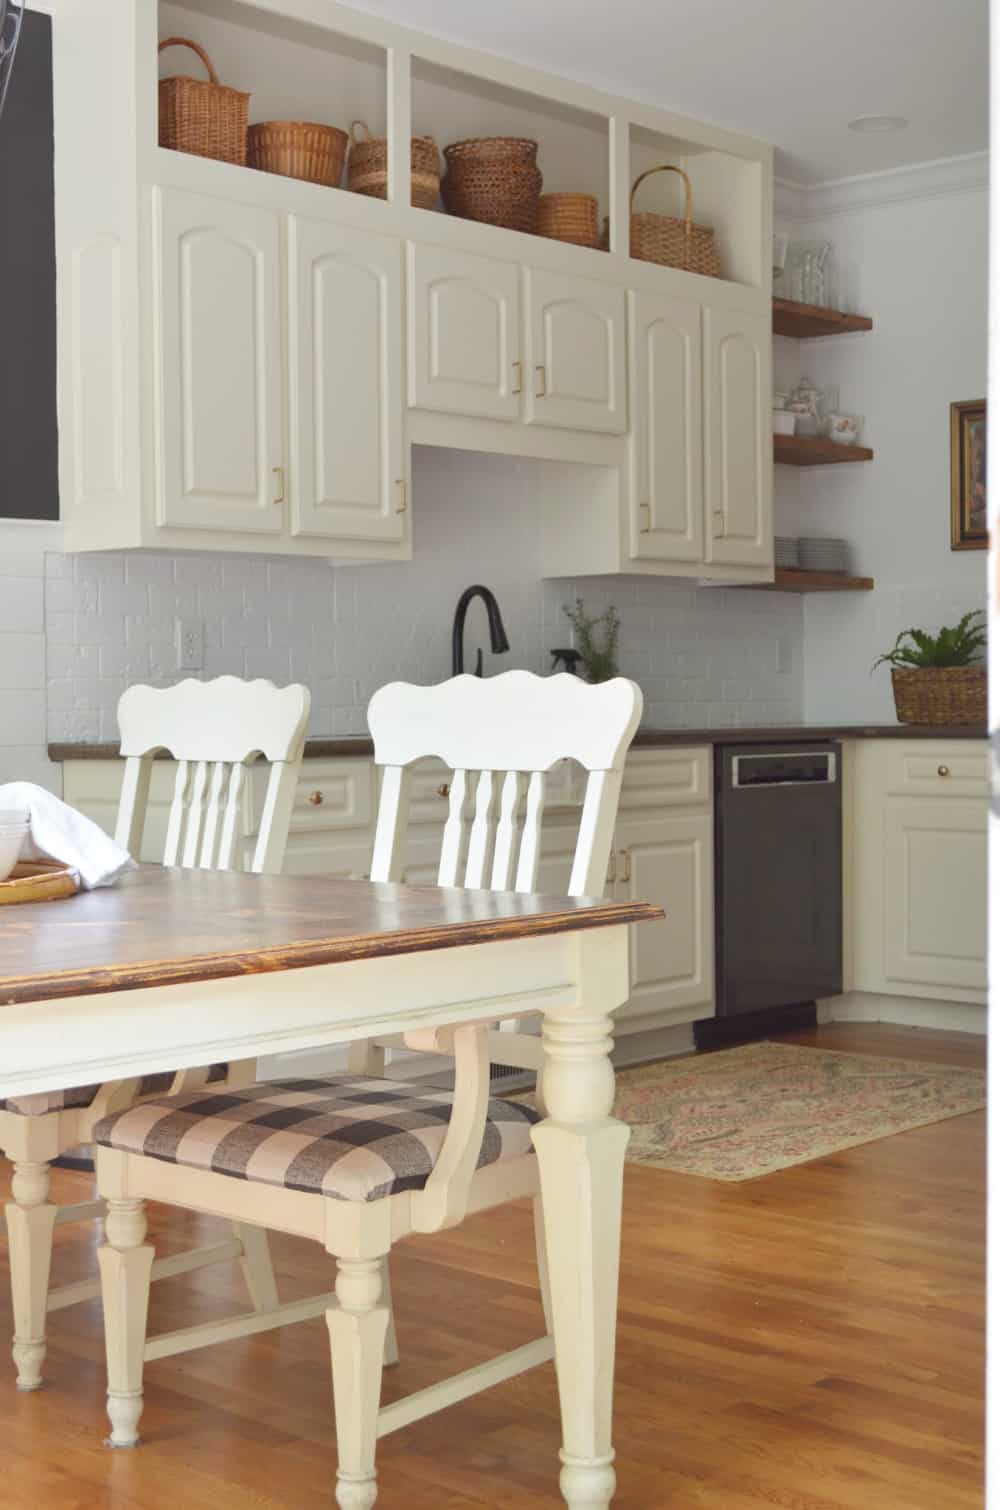
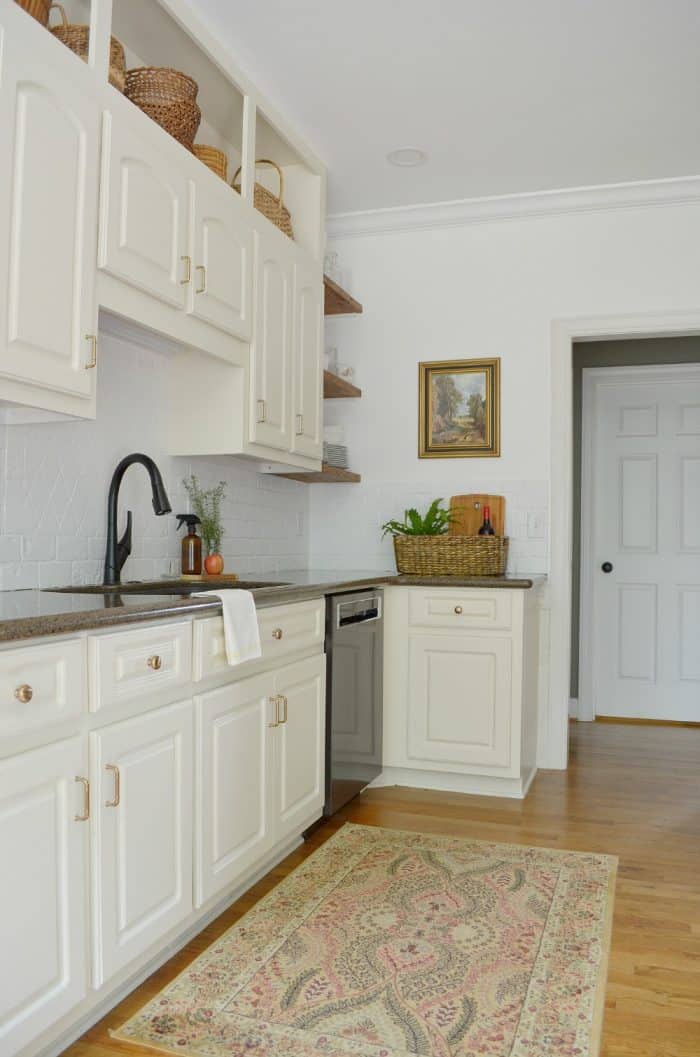
Painted Kitchen Cabinets Tutorial
Full tutorial for painted kitchen cabinets including tips and tricks to get the job done faster. Paint is the best way to makeover any room in your home and can make the biggest impact.
This is my most up to date painted cabinets post. You may have been linked to this post from elsewhere on my blog. Therefore, some of the photos may be different. In an effort to stay current I wanted to use my most recent kitchen makeover photos.
Over the years I have painted more kitchen cabinets than I can remember. It is a labor intensive job. Mostly because the kitchen is the heart of the home and when it gets disrupted the rest of your life gets messy. Eating is important, right.
This post may contain affiliate links. See full disclosure policy.
Painting cabinets make an amazing room makeover. See lots more of our before and after home projects for inspiration.
Secrets you should know
- For this post, I am specifically talking about painting over already painted cabinets.
- There will be lots of tips that will work for stained cabinets as well, especially the prep work.
- When in doubt prime and/or sand first.
- Unless you have multiple people helping you to bust through this in a weekend, plan for a full week of DIY. Allowing cabinet doors to dry before flipping over is very important and takes time.
- Be prepared with meals for you and your family. Cook ahead of time or get pizza delivery. Makes your life much easier.
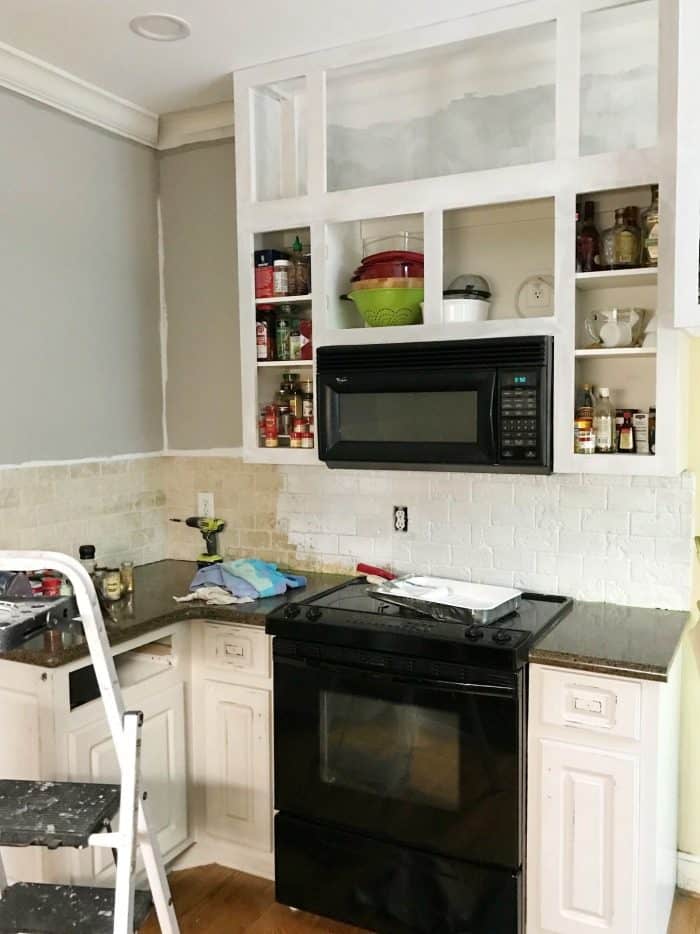
- I do not paint the cabinet box interiors. Never have.
Supplies
- Degrease Cleaner (Earth Friendly, water-based product that is biodegradable and odorless.)
- Chemical resistant gloves
- Latex paint color of choice ( need help choosing the right paint type)
- Paint Brush (for first coat of paint and detail areas)
- 6 inch foam rollers (for final coat of paint)
- Mini Roller Handle
- Painters tape
- Drop cloth
- Clean rags
I often choose a paint and primer in one EVEN when I am using a primer. The extra coverage is always a good thing. As far as the brand, I like Behr Premium Plus and Sherwin Williams Cashmere. I have also heard great reviews of Benjamin Moore Advance but I have not used it.
When choosing a brand I take into consideration, smell, coverage, and what store I am shopping that day. I am highly sensitive to smell so for me that is top priority.
The paint finish you choose is up to you. It will depend on how shiny you want your cabinets. I would choose a satin or semi gloss.
Keep in mind though, prep work is just as important as the type of paint. Paint can only stick to a well prepared surface.
If you are new to painting cabinets you may want to go with cabinet specific paint because of the self leveling nature.
Prep work
- Cleaning cabinets with a degreaser is a must. Follow directions on the bottle.
- Remove cabinet doors. Stack them up somewhere out of the way. Remove the hinges making sure to label them as to which door they go with. My trick is to put all of the specific door hardware in a ziploc bag and lay it back inside the cabinet box where that door goes.
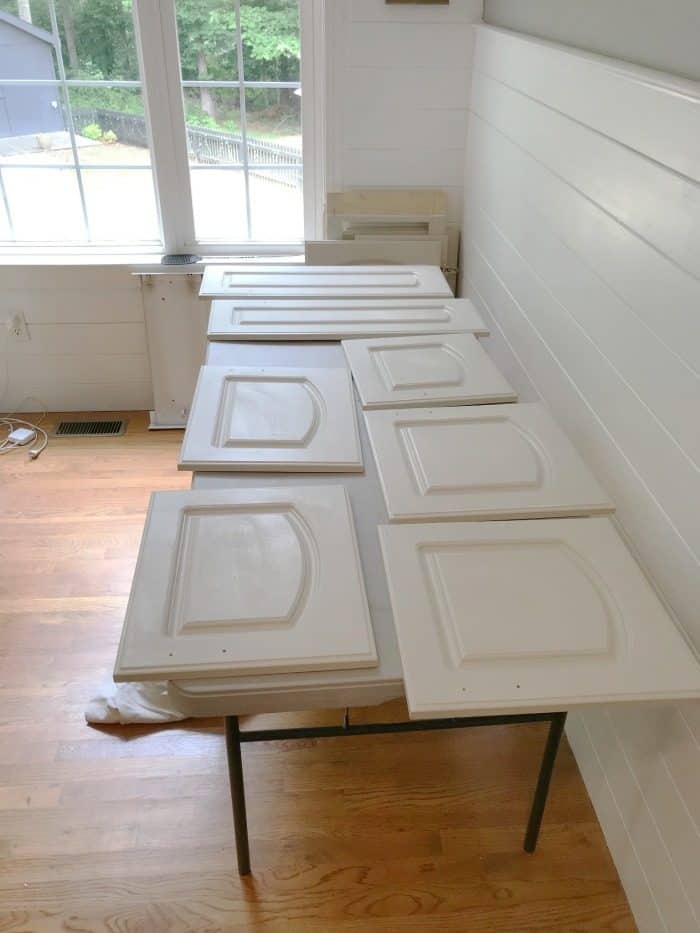
- Prepare areas for painting the doors where you can leave them for a couple of days.
- Layout drop cloth before painting.
- After cleaning is done apply painter’s tape around the cabinet boxes if you are uncomfortable with your edging skills.
Paint
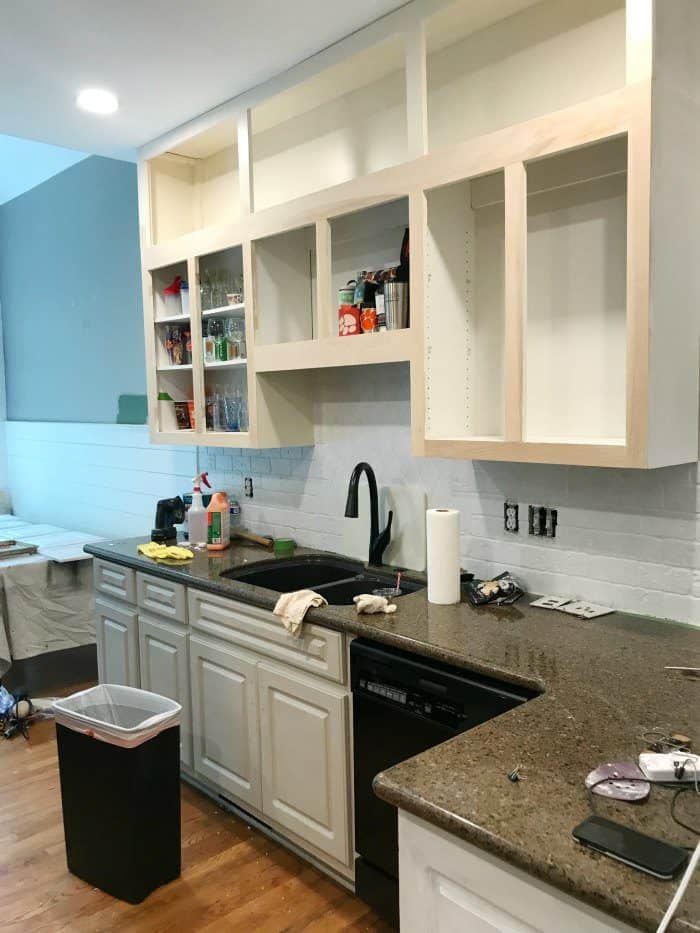
- Prime the cabinets. Zinsser Bullseye 123 water based is my go to. It will be up to you if you want to prime the boxes and cabinet doors at the same time. If you are living in the space while you paint determine what will work best and disrupt your space the least. Primer dries fast so there isn’t much wait time.
- Paint cabinets. I paint with both a brush and a foam roller. The brush is needed to get into some of the details. The foam roller is used to create the smooth paint finish. You can certainly use a paint sprayer but I prefer doing it with brush and roller. Spraying will have to be done in a well ventilated area, mostly like outside.
- When painting cabinet doors, allow paint to fully dry before flipping to the other side. This is why I always make sure the cabinet door front gets done last.
- Keep your paint brush wet at all times during the process. Wrap it in Cling Wrap during waiting times. If you need to carry on to the next day you can wrap as well but I suggest you go ahead and wash. This will help keep a good brush for good paint surface.
- Once paint totally dries reattach hinges and hand doors. Then put hardware back on doors and drawers.
Hiring a professional to paint kitchen cabinets can get very pricey. Think $2500 and up. If you have the desire to do it yourself I hope this tutorial is helpful.
Be sure to check out our entire kitchen makeover along with how we gave our cabinets a facelift.
If you have any questions that I may not have covered, PLEASE feel free to ask!
AND if you aren’t already I would love for you to follow me on my social channels.
Click PIN IT to save this graphic and post to your Pinterest boards. It helps me get the word out about my blog as well as save the project for when you are ready to paint.


I am happy to help. Email me your questions and pictures if you can to [email protected]
I neeed some advice on all this stuff please. I’m giving my kitchen a facelift but know nothing of interior design just can do the work. I’d love to tell you what I’m doing and get real world advice, nobody else seems to want to even though I’ve bought all the stuff 🙂
We used these tumbled stones. https://go.shopyourlikes.com/pi/cc093e5c737f176b836bb0eef6f0d22501623820?afId=632227&afCreativeId=2996
The detail behind the sink was also tumbled stone in a shade darker.
Hi there. The kitchen is beautiful. My question for you is about the backsplash tile. Can you tell me the name/product brand? It’s perfect for my soon to be painted to white kitchen cabinets.
I recommend a foam roller, it will give you the smoothest finish. Here is my affiliate link for the kind I use. https://amzn.to/2spBegO
Hi, I am painting my cabinets white Satin paint.
What type rollers do you use ,what nap. I want smooth cabinets. I primed them 2 times and painted the end cap. Not the actual cabinets yet. I sanded in between primer and paint coats for the smooth look. The end caps are great looking just not entirely smooth. Thank you!!!
Love your cabinets. I decided to paint my cabinets on each side of the fireplace and the kitchen. I’ve got the ones by the fireplace primed and about to head to Sherwood Williams for the paint and glaze. The guy at the store had told my husband a gloss paint would be easier to clean. I see you recommend a satin or a eggshell. How long do I need to wait to apply the glaze after I paint? My husband wasn’t thrilled with the whole idea to start with.( Didn’t understand why I wanted to coverup that honey oak stain) I sure don’t want to mess them up.
Thanks for your help
You can go ahead and glaze them once the paint is dry. Two days is plenty. Putting glaze on the frame box depends on the look you are going for. In this post here, https://athomewiththebarkers.com/glazing-mdf-versus-real-wood/ you can see both ways. The oak cabinets have it on the entire cabinet including box while the MDF cabinets only have it in the details. This post, will help with either way. https://athomewiththebarkers.com/how-to-glaze-cabinets/
Hi Sonya!
Love the look of your cabinets! I just painted mine with Sherwin Williams Proclassic satin finish in Alabaster. I would love to glaze them as well. How long do you recommend waiting to glaze after painting them? I’ve heard they should cure first? Also I have never really seen any comments about whether people put the glaze on the frames of the cabinets ? Trying to decide on that? Any suggestions/tips appreciated ?
You are so sweet thank you!! This should help you. I recently edited this post but if anything still seems unclear just email me at [email protected]
https://athomewiththebarkers.com/how-to-glaze-cabinets/
Hi. I know this may be a silly question but do you have a step by step list on what you did to prep, paint and glaze your cabinets? Your cabinets are one of the very few DIY that look stunning!!!!
It was only glaze. It gives the antiqued look with out anymore work.
Hello,
My name is Theresa. I read your article about your kitchen cabinets. That is exactly the color and look I want. But I’m not crafty or artistic and really not capable of painting my cabinets without messing it up. But my question is, did you distress the cabinets after you painted them or was it the glaze you used?
Any help you can give me is great.
I like to use the cheap foam brushes, like these (affiliate link) https://amzn.to/2jr732H
I usually buy the value pack in order to have different sizes on hand. Good Luck with your cabinets.
Love your cabinets! Currently in the process of redoing mine!?What kind of paint brush did you use for your glaze?
I love your cabinets! Have you ever used the Sherwin Williams raw umber glaze?
Depending on the look you are after it can look different and some people like the heavy glaze look, but messy is never what I would call it. Email me at [email protected] if you need me to see photos.
Once you finish the glaze, should it look messy looking? My cabinet maker has finished the cabinets with van dyke brown glaze but they are real messy looking and I’m not sure if that is the way it is supposed to look or not. I can send you a picture if you give your email address to me. Thanks very much.
What color would be comparable to the Raw Umber? I love this color for the glaze Help!
I just wrote a post all about glazing! It should help you. ~Sonya
Do you apply the glaze with a small paint brush? Just on the edges as shown?
No to both. I am sure to clean the cabinets really well before with a degreaser. I use Krud Kutter.
1)Did you prime before painting with SW antique white?
2)did you use a clear sealant after glazing?if so did it end up causing a yellowing?
Beautiful job by the way!
Beautiful work! I am curious if after a few years now, how your cabinets have held up? I have seen different posts about using acrylic latex paint and other swearing by oil based for cabinets. Are you still happy with them at this point? Thank you!
were your cabinets thermofoil and you removed it before painting? I’m curious because in a different post about glazing MDF vs real wood you said these were made out of MDF..
I love love love your cabinets!! I would very much so appreciate it if you could do a more detailed description on how you aged the cabinets, and what color is closest to the glaze you used!! Thank ms!
I love your kitchen. I’ve been wanting to do this to mine for a long time but I’m to scared to do it. I am afraid the paint will peel or wear off. I recently bought a huge entertainment center made of MDF. I think I will try it on that first. Thank you for posting so much info on colors and techniques.
I did only add mine to the places I wanted it to go but glaze can spread easily and when you have wood grains it will show more. You can always use a small artist paint brush and put it exactly where you want it. This post I wrote comparing the 2 types of wood may help you. Good Luck! https://athomewiththebarkers.com/glazing-mdf-versus-real-wood/
Hi. Love this. I want this exact look on my builder grade oak cabinets. All tutorials I’ve seen tare glazing the whole thing but I want to see the glaze in all the edges, like yours, and when I ri that with crafting projects, I sand those edges do theyll disk up the color. Did you just paint the glaze on the edges you wanted colored, and it didn’t stain the surrounding paint? Your way seems much easier and leaves less room for error. I just want to make sure I understand correctly before proceeding. I
The wall color in this post you are commenting on is Hopsack. I have changed it now and I love it. It is painted Mindful Gray in this post. They are both Sherwin Williams colors. https://athomewiththebarkers.com/kitchen-makeover-part-1/
what color paint is on your kitchen walls . Building new house and we have antique white cabinets and unsure of a nice neutral color to use
You should be able to glaze the cabinets you are buying. The only thing is if they thermofoil, I’ve never glazed over that product. As far as sealing the glaze, you do not have to do that. It is a one step product. Good Luck!
I will be buying new white kitchen cabinets (not painting mine) and want to add a distressed look in the detailed areas only (I don’t want to distress the whole cabinet because it changes the real white color to a cream color). Do you think your glazing method in the detailed areas would work on factory cabinets – meaning would it adhere? And would I need to do a final process to “protect” the glaze that I put on the cabinets so that it doesn’t wear off
I will be buying new white kitchen cabinets (not painting mine) and want to add a distressed look in the detailed areas only (I don’t want to distress the whole cabinet because it changes the real white color to a cream color). Do you think your glazing method in the detailed areas would work on factory cabinets – meaning would it adhere? And would I need to do a final process to “protect” the glaze that I put on the cabinets so that it doesn’t wear off.
Great place to start! Thanks for your sweet words!!
I love your kitchen. I’ve been wanting to do this to mine for a long time but I’m to scared to do it. I am afraid the paint will peel or wear off. I recently bought a huge entertainment center made of MDF. I think I will try it on that first. Thank you for posting so much info on colors and techniques.
Mine has a slight texture sounds like yours but not very noticeable. The only way for them to be perfectly smooth is to have them sprayed.
Hey there! Thanks for this wonderful blog post! I am going for this same look in my bathrooms. I used the same SW paint as you and a foam roller. The only problem I ran into was the roller left an orange peel texture on the the cabinets. How did yours end up so smooth or do your have a slight texture too and I just can’t tell in the pics? Thanks!!
Yes, I’ve had this issue as well 🙁 I had to mix my own with latex paint and clear glaze. Here is what I did for a client. Hope this helps.
https://athomewiththebarkers.com/glazed-kitchen-cabinets/
The valspar raw umber is no longer available. Do you have a suggestion for something similar to that color. I am also using antique white by sherwin williams for the color of my cabinets. Love how yours turned out!
Thank you so much! I appreciate your kind words.
I Had to tell you what a Awesome Job You Did On your cabinets!! I’m a Kitchen Contractor And I’ve Installed lots of brand new cabinets That were Glazed and I Must say Yours are right there with them!
Great Job!!!!
Sonya, What finish was the Cashmere antique white. I have been looking for a matte finish to do my cabinets?
Thanks, we are retired and want to redo cabinets to most modern colors. I like yours very much. I want to get the antiquing or darker highlights more consistent in the darker color. At this point do you have any new suggestions to accomplish this? We have always done our own painting, but we may need help this time. Age does matter!!
Thanks,
Sue
Do you think this color of cabinets would look good with gray walls? Transitioning my taupe walls throughout my house to gray. Thanks
We did the same look in the kitchen of our house before this one. Added great value! Just in case you may be interested, we wanted our electrical switch plates to match our hardware. We got that by painting them with Rustoleum Spray Paint using the Oil Rubbed Bronze color. Yes, spray paint on plastic switch plates! To buy the “real thing” in switch plates it would’ve cost $100, as we had a lot of them! You can’t scrub them, but the new owners still have them & it’s been 5 years! Beautiful kitchen!
The only way to lighten with glaze will be to tint the glaze to the color of grey you were hoping for. This would require you glaze the entire cabinet. If the color is one you really don’t like, then you may have to repaint. ;(
Can you direct me to a website or blog that will help lighten my freshly painted gray/green cabinets. They turned out darker and more green than gray. I would like to pull the gray out of the color with glaze if possible.
Is there a website or blog I can go to to figure out how to lighten my gray/green cabinets with glaze? The color I just painted my cabinets with has dried a little darker and more green than I had hoped. Was looking for more gray in the color. Is there a way to enhance the gray in the paint with a glase?
It looks very nice especially for latex paint. But we usually recommend using oil based paint for cabinets.
Yep, you’re right…it is actually low lustre that I used! Thanks, I’ll correct in other comment.
Cashmere doesn’t come in “eggshell”.
Mine are just like yours before you painted… Have you had any chips in the paint at all? What type of paint did you use?
These are the MDF cabinets, right? What type of paint did you use and have you had any chips on the paint? I’m just worried that the paint won’t stay on mine… Currently they look like yours did before you started on them. Let me know any tips!
Thanks! I did not do any sanding just cleaned them very good first but that all depends on the finish that is on your current cabinets.
The cabinets look great!! So sorry as I may have run over a couple of details, did you sand the mdf cabinet doors here down before you painted them? Plan on using your colors in our kitchen. It looks great. Thanks! I’ll check back let me know soon!
Mine were not thermofoil but my friend Beth has done a few kitchen cabinets that did have it! You can see her post here. https://farmfreshvintagefinds.com/painting-thermofoil-cabinets-annie-sloan-reveal/
Did your cabinets have thermofoil on them? If so did you remove before painting or did you paint and glaze on top of the thermofoil?
I want to paint and glaze mine but not sure if I need to remove thermofoil first. Thanks
Here is a link to the before and after colors! https://athomewiththebarkers.com/kitchen-makeover-part-1/
Love the cabinets. What paint did u use on the walls?
I have wood cabinets so does that mean that I can not just glaze the crevices? I looked at the pictures of MDF and wood . Will I get a just painted look if I do not stain them with the glaze? I like yours with the crevices but when you have wood will it be hard to wipe off all the paint on the area other than the crevices? I love your cabinets.
I wrote more about glazing the oak cabinets here. https://athomewiththebarkers.com/glazing-mdf-versus-real-wood/
Your cabinets are gorgeous! I am in the process of painting mine but they were originally the honey oak. I had no luck in the glazing…I tried 3 different glazes….valspar clear mixed with paint, a glaze from benjamin moore and a glaze from Ralph Lauren and never could get the look like yours. I couldn’t control the glaze just being in the crevices then it just ended up looking dirty, so just repainting them an antique color. Would love to see the pic you did of the oak cabinets.
No, I did not.
Did you seal the cabinets after painting?
Thank you for the very quick response!!
Thank you so much! I used Eggshell because I don’t like shiny. 🙂
Hi, Sonya – absolutely beautiful!! Was wondering what sheen you used in the SW Cashmere paint – flat, eggshell, satin or something else? Thanks so much!!
In that case, I am thinking it would be best to only glaze the detail areas as I did on the MDF so you are not actually showcasing that the fronts are oak. If you like the look I got when I glazed the oak then you can try to faux glaze the sides but it will look different that the front.
I love the cabinets. They look beautiful. I want to do the same to our kitchen but our cabinet doors are oak and the sides are MDF. Do you have any suggestions on what I could do?
I thought you might be interested in a new post about the glaze on the cabinets! ~Sonya
https://athomewiththebarkers.com/glazing-mdf-versus-real-wood/
I love, love, love this look. But I too have honey oak cabinets. I would love to see a pic of the oak cabinets you did. Thank you
The effect will not be the same. I have painted oak cabinets for a client that I used the same color as I did for mine but they look different but awesome. I am going to send you an email pic of those cabinets. Maybe I should post it as a blog post since I get asked often about Oak.
Love Love Love your cabinets! This is exactly what I want to do. I have the same tile as you but I hate my cabinets. Replacing them is out of the question, so painting them is my only options. I have Oak cabinets so do you this I would have the same result as you?
Thanks so much Beth! Your kitchen inspired my recent wall color change. https://athomewiththebarkers.com/kitchen-makeover-part-1/
Whoa, perfect color and beautiful transformation! Pinning this one for sure!
Sure you can! Depending on the type and color of wood you can always prime them and paint! 🙂
I love the color and is exactly what I am looking for…..but I was told that I can’t go from brown cabinets to this color?. Is that true! !!! I need advise please
My cabinets are MDF and they were painted white when I started. The thermafoil is tricky…There are primers (grippers) that are suppose to help paint adhere to any surface. You could try that. Check with a specialist at your local paint specialty store (not hardware store) they will be the most knowledgeable. Thank you for your sweet comments. ~Sonya
Your cabinets look fantastic – even after so many years! Quick question: what type of cabinets do you have? Wood? Thermofoil? The reason I ask is because I have white Thermofoil cabinets and want to duplicate this look (creamy white with glazed edges) but I’m not sure it will “stick” to the Thermofoil.
Nikki
You are welcome! Good Luck with yours ~Sonya
Thank you so much!! I’m going to try again 🙂 third times a charm, right?
Your cabinets are exactly what I’m wanting!! Thank you for the inspiration! God Bless.
For my cabinets I did not wipe the glaze all over, I didn’t want that dirty look either. I used a cheap sponge brush and wiped the glaze over the areas that had detail. I only let it sit for about 15 mins then I went back and wiped away the excess. I do wet my cloth when I wipe it away. This takes away all of the glaze except what has went into the cracks. Of course, don’t apply too much pressure or you will just wipe it all off. I use my finger a lot too. You can wipe the glaze directly in the cracks with just your finger.
Your cabinets look very nice!! I love the finished look!
So I’m in the process of doing my cabinets and I’m having trouble with the glaze. How did you get your glaze so perfect?? I need help! I’ve tried the all over and wipe off method and they looked too dirty (too much glaze). And I’ve tried with a all brush, but again, too dirty.
Any step by step instructions for your perfect glaze 🙂
Thank you!!!
The glaze is simply amazing! that’s what I call a good paint job!
Thanks for finally talking about >Painted Kitchen Cabinets <Liked it!
Yes, I did use low luster!
Love the cabinets!! Did you use the low luster Cashmere?
I used the Cashmere Paint from Sherwin Williams and painted with a sponge roller. Looks smooth!
I love what you did with your cabinets. We just moved into a new home and the kitchen is so dark. I really want to lighten it up but I am wondering if painting these dark cabinets an off-white color would work. Might have to spend for refacing. Just not sure what to do. Do your cabinets show brush marks? I see that you used a paint brush in the detailed ares.
What was on the cabinets before you painted them? We’re they stained or painted?
You are so sweet, thank you! I didn’t do anything after the glaze and I painted these cabinets 6 years ago this month!! YES, really that long and I still love them. The are very few little spots where paint has rubbed off around 2 drawers that are most used. I could just glaze over them but really no one notices! ~Sonya
Hi, loved the kitchen color. Did you used anything after the glaze? Also how long ago did you painted your kitchen? Is it still ok? Sorry for to many questions. You did a great job!!!!!
Hey Erin, I used the Raw Umber glaze that I bought from Lowe’s. If you buy the clear you will have to add paint to it in the color you are wanting it to be. I applied the glaze with an inexpensive chip brush in the areas that I wanted to accentuate. Then went back over it with a cloth to wipe off excess. Thanks for stopping by my blog! ~Sonya
Hi Sonya,
How did you apply the glaze? Was this painted only on the areas that had the details? Did you add color to your glaze?
Thanks!
Thanks Pam! NO, I did not sand. Just be sure to clean them well with a degreaser.
Did you sand the cabinets before painting? I love them!
I’m sure it will. Depending on the grain in the wood they could look much different but the technique can still be used as long as you have places that the glaze will be picked up.
My cabinets are around 30 years old and am wondering if that matters???
Hey Jennifer, I did not prime or strip the cabinets. I can’t remember what exactly I used to clean them with but it would have been just a household kitchen degreaser. I used a glaze for the detailing. I listed what kind in the blog details. Thanks for stopping by! ~Sonya
Hi Sonya,
Great job. I’m interested in how your prepared the cabinets for painting? Did you use a primer or a stripper to remove the previous finish? Also, how do you get the brown effect in the edging of the cabinets? Did you rub those parts with a wax? Sorry if I’m sounding clueless. I’ve read so many different pins in painting cabinets and everyone seems to do it a different way.
Many thanks, Jennifer
🙂
Oops nevermind I saw that you already answered my question in another post.
I live your Kitchen and I am currently doing the same to mine. I was wondering about the glaze did you paint the glaze over the entire cabinet or just where you wanted to highlight the details?
Congrats on buying a house, that’s exciting! I did not seal the cabinets. The cashmere paint has held up very well. I painted these cabinets almost 5 years ago and these pics were taken recently. Please let me know if you have anymore questions! Sonya
We are getting ready to buy a house…Friday 🙂 and we are saving money by painting the cabinets..you’re look EXACTLY what I want. Question. Did you seal them with anything. I’ve been trying to research about what to seal them with but not much info on it. Thanks 🙂
Thank you soo much or the response, Sonya. Last project I wanted to see my brush strokes and did glazing all over because I wanted it to look very aged. Starting a new project and want it similar to your results – good to know the sponge rollers give such a smooth look. Thanks again.
Hey Darla, I did have to use a regular brush to get into the details. I used a small 1-2 inch wide foam brush to put on the glaze. I did not put it on all the cabinets just brushed on around all the details, then wiped off excess with a rag. That’s the best part about glaze, you have lots of work time before it sets up. Anymore questions, please just ask! ~Sonya
Did you use only a foam roller or did you use a brush on the intricate areas of the drawer? Also, when you glazed, did you only apply it where you wanted it or did you apply all over and then wipe? Thanks.
Your kitchen looks amazing, I love it!
Cindy
I would love for you to share and link up at my TGIF Link Party. The party is open every Thursday night and closes Wednesday’s at midnight.
https://apeekintomyparadise.blogspot.com/
Have a wonderful week!
Hugs, Cathy
Thanks so much for stopping by! Your french country cabinets looked great…it really makes such a difference. ~Sonya
Your cabinets turned out great! I love SW Cashmere paint for walls, I’ve never tried it on furniture. I always use oil paint or chalk paint.
Thank you so much Kerry for your kind words! I look forward to seeing your cabinets when you finish them! I have a teen son who is also getting a room makeover so I am heading to your blog now to see yours! ~Sonya
Wow – these look beautiful! Thanks for the info; I have to paint my cabinets soon and have been researching the best technique. Yours are just what I want!
Thank you so much! Heading over to check out your blog! ~Sonya
Your kitchen looks amazing and great info on how you achieved this look. It really is beautiful. I would love for you to link this up to my Inspire Me party that is ongoing. https://www.astrollthrulife.net/2013/05/165th-inspire-me-tuesday.html
Hugs, Marty
GORGEOUS! I love these cabinets!
They are gorgeous Sonya! I love Sherwin Williams paints! That glaze is perfect 🙂
I hope you have a great weekend!
Nancy
Hello friend! Yes…the glaze makes a huge difference!
Love the color and your cabinets look amazing! Isn’t it fun what a little difference a bit of glaze makes!
Happy day!