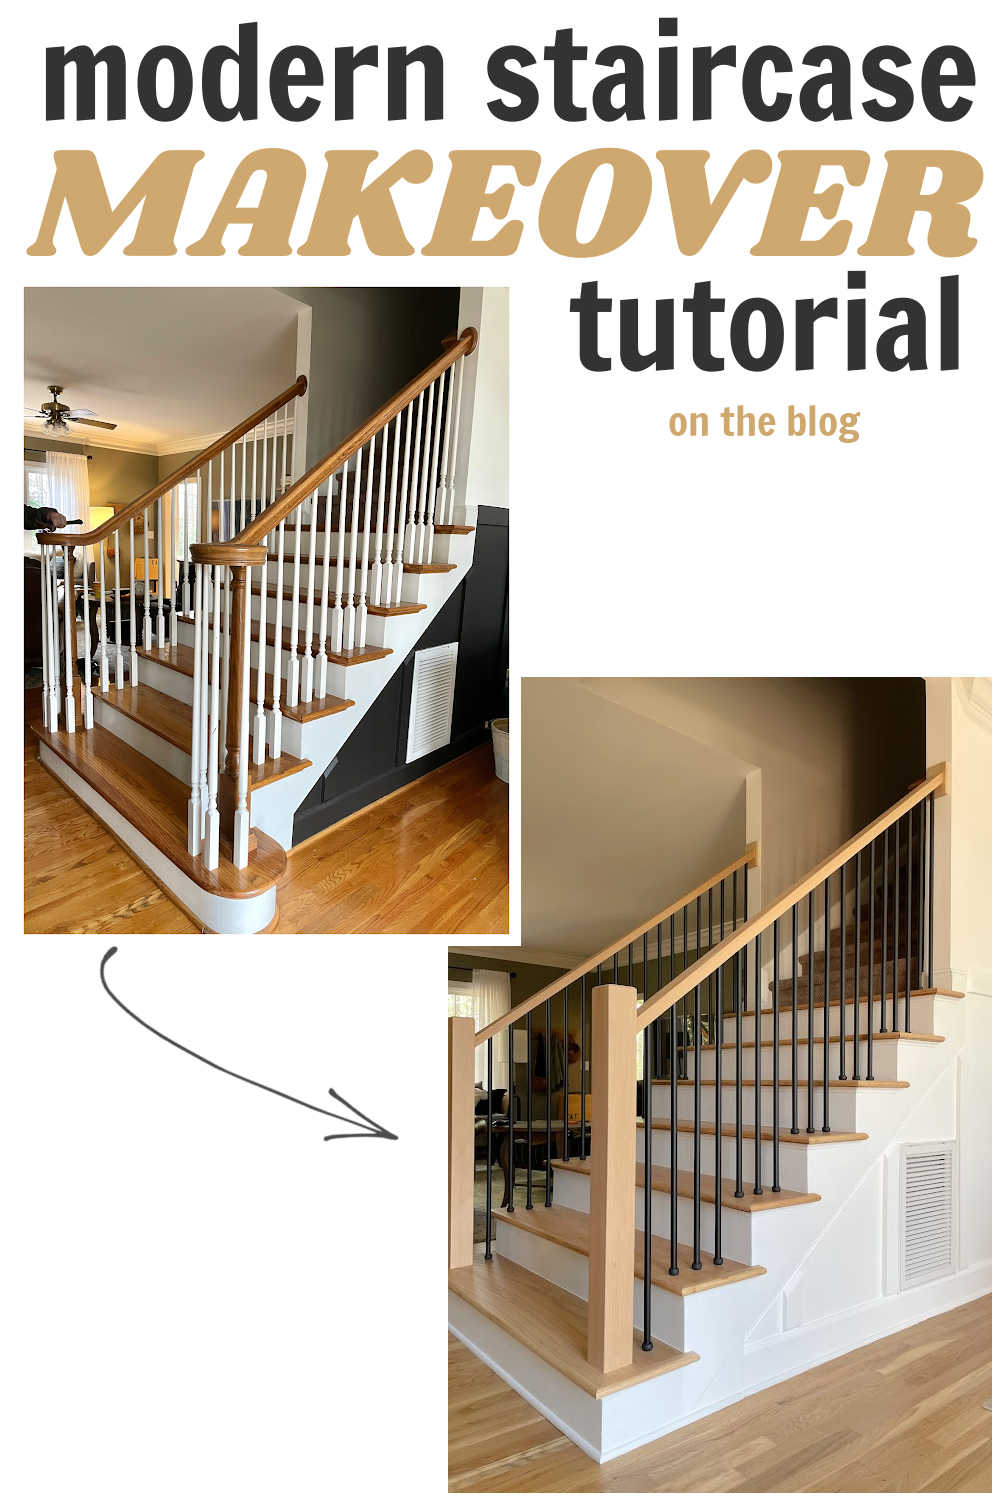
Staircase Makeover
If you’re looking for a way to update your home, a staircase makeover could be the next project you should consider. Doing it yourself could really save you money as well.
This staircase makeover project is a way to update your interiors. The staircase is usually the focal points in the home and can be seen from different rooms. A change to the stairs can make a big impact.
This post may contain affiliate links. Please read full disclosure.
If you’ve been around here long, you know Ray and I tackle most of our home improvement projects ourselves. Hiring out the floors refinishing was a smart move. Remodeling the staircase now, as the hardwood floors were being refinished, was the ideal situation.
Like most homes, our staircase is front and center. Giving this area a makeover can truly change the look and feel of the entire home. You can see our dining room and living room from the stairs. Many of our before and after home decorating projects don’t involved a full renovation.
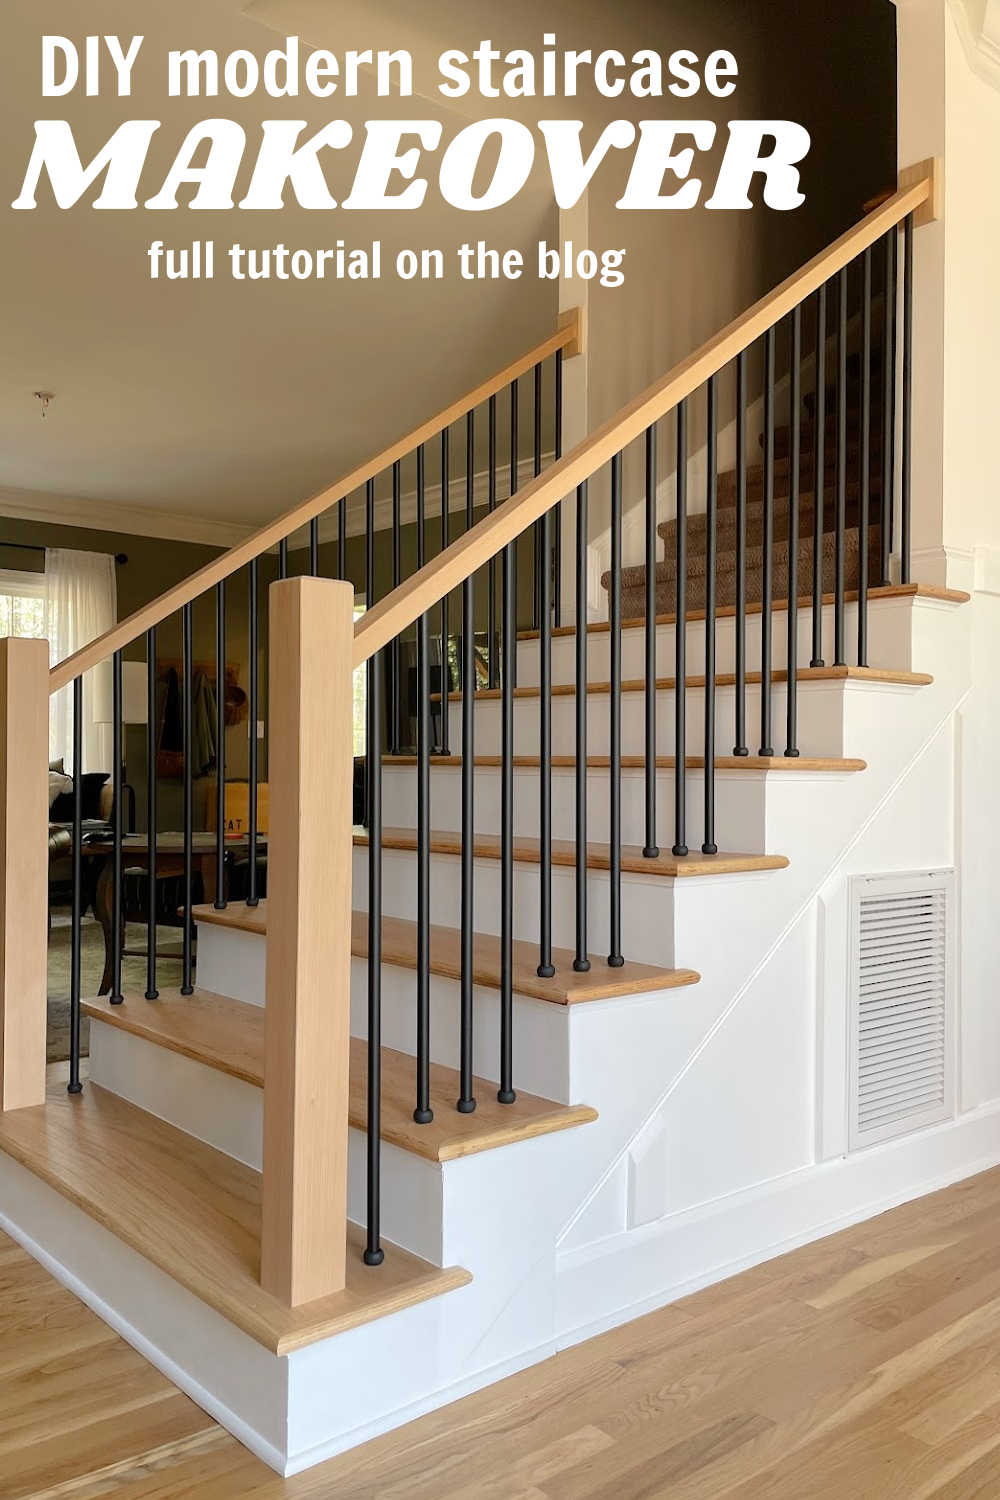
DIY Modern Staircase Makeover
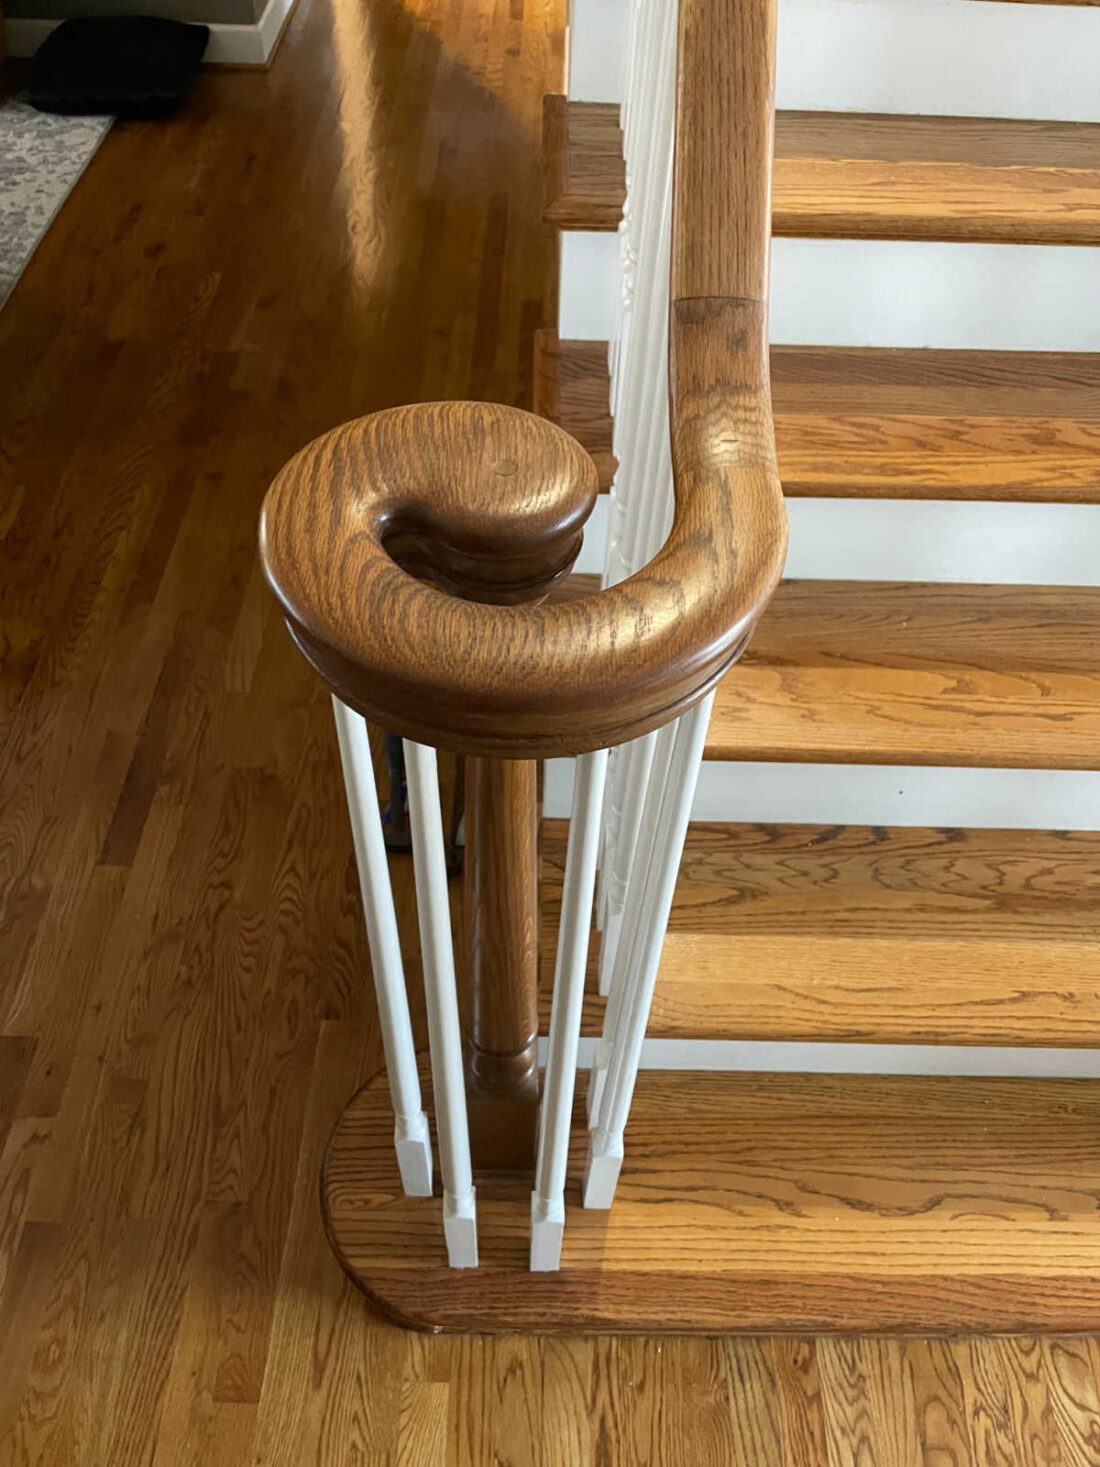
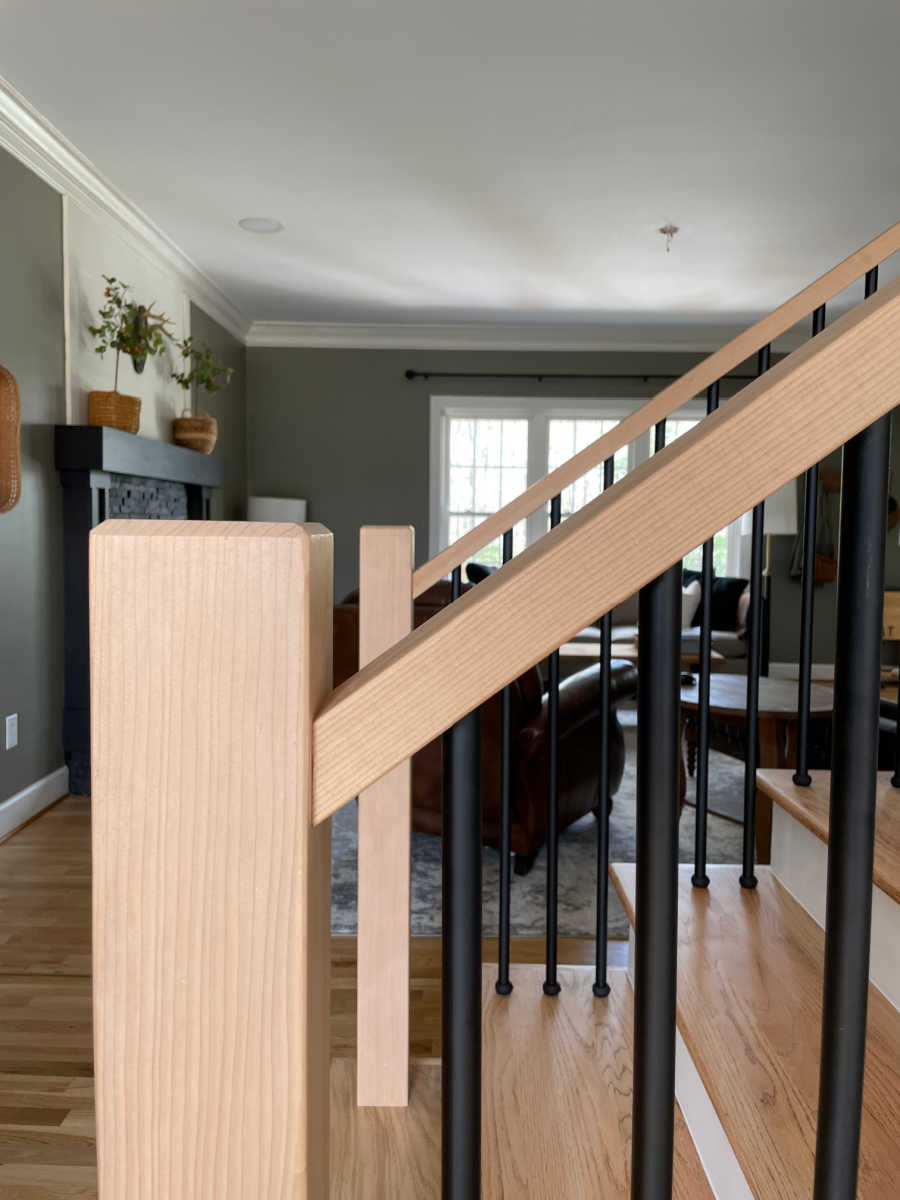
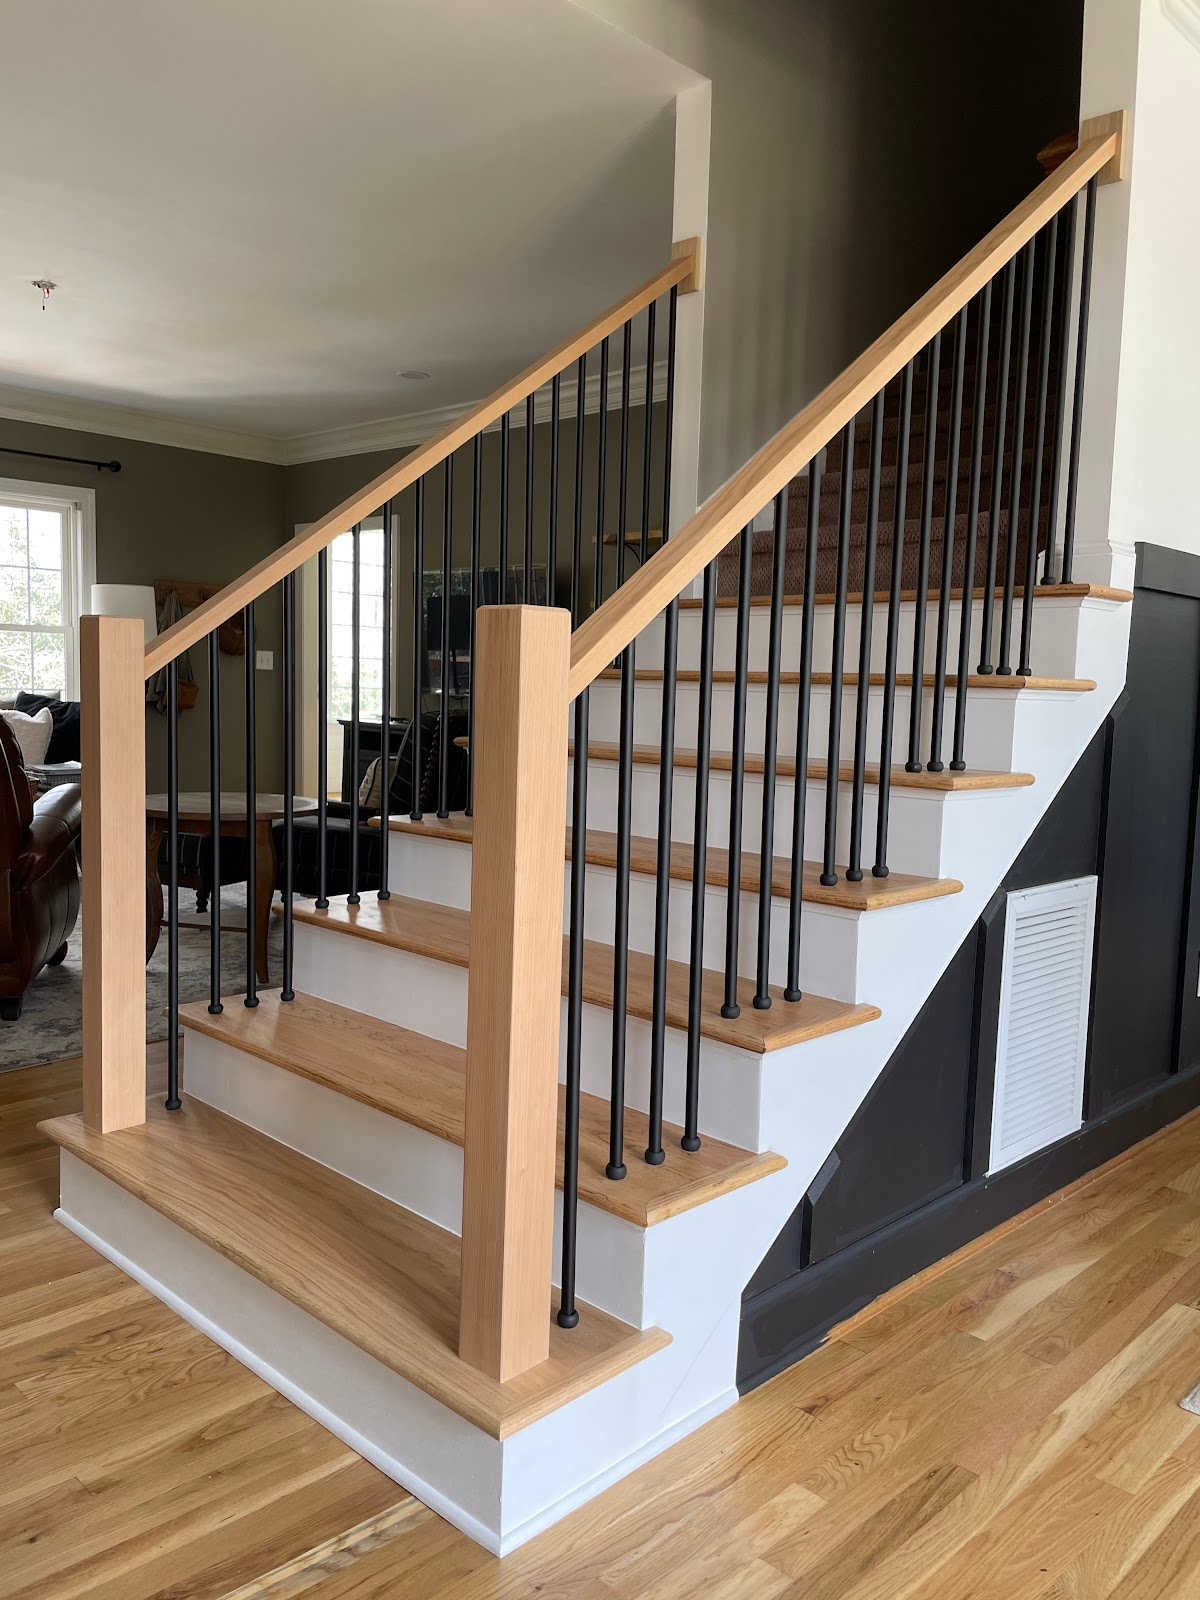
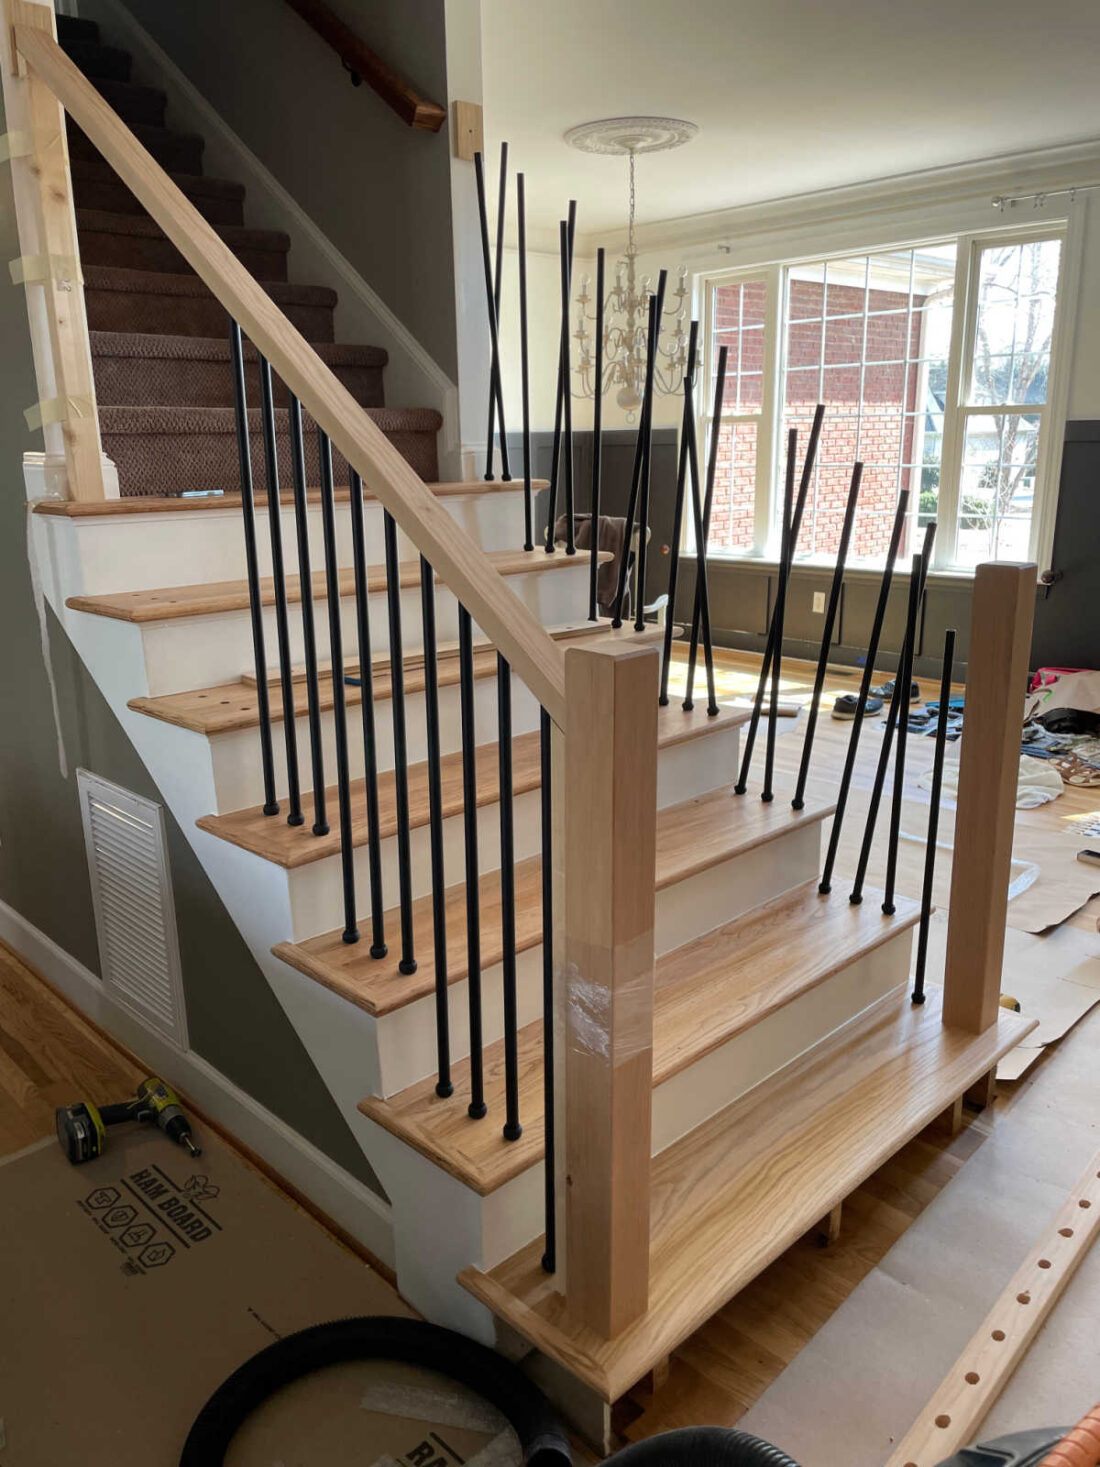
Our stairs were traditional with a curved starting step and curved handrails. I wanted to square that off by replacing the tread. Squared lines can look craftsman style and that was not the look I was choosing for this makeover.

How did I decide the new look? I searched through some of my favorite interior designer portfolios to find photos of staircases that appealed to me. I looked through their websites and Instagram feeds for inspiration. This is the same technique I use when planning room makeovers.
I shared the photos with Ray and told him the parts that I wanted to incorporate. We begin searching for places to source the materials to make sure everything would be available. The supply chain issue has put a squeeze on being able to get some materials.
Once we had all materials identified, we knew we were ready to proceed with our makeover.
This is how design ideas often work between Ray and I. I have lots of ideas in my mind. It helps Ray’s engineering brain to visually see what I’m thinking. For anyone married to an engineer will understand.
There are alternatives to full staircase renovation. You can opt for painting the handrail and your newel post, striping to a lighter stain or change the wood balusters for wrought iron. There are options. We decided on a full demo.
Frequently Asked Questions
You can update your stairs just like we did as a DIY project. Doing the staircase makeover work yourself is a great way to save money.
Paint is always the most affordable way to update anything in your home.
You can modernize your staircase by adding black iron and cleaner lines.
Depends on the budget. You can make your staircase better just by refreshing the existing paint and stain.
First you will need to remove carpet, staples and tack strip. If your treads are not solid wood you will need to replace them. This can be a big expense so be sure you are prepared. Assuming you have solid wood you will then fill holes with wood filler. Then sand the entire wood tread with 120 grit to remove any debris and possible glue. You can then stain them.
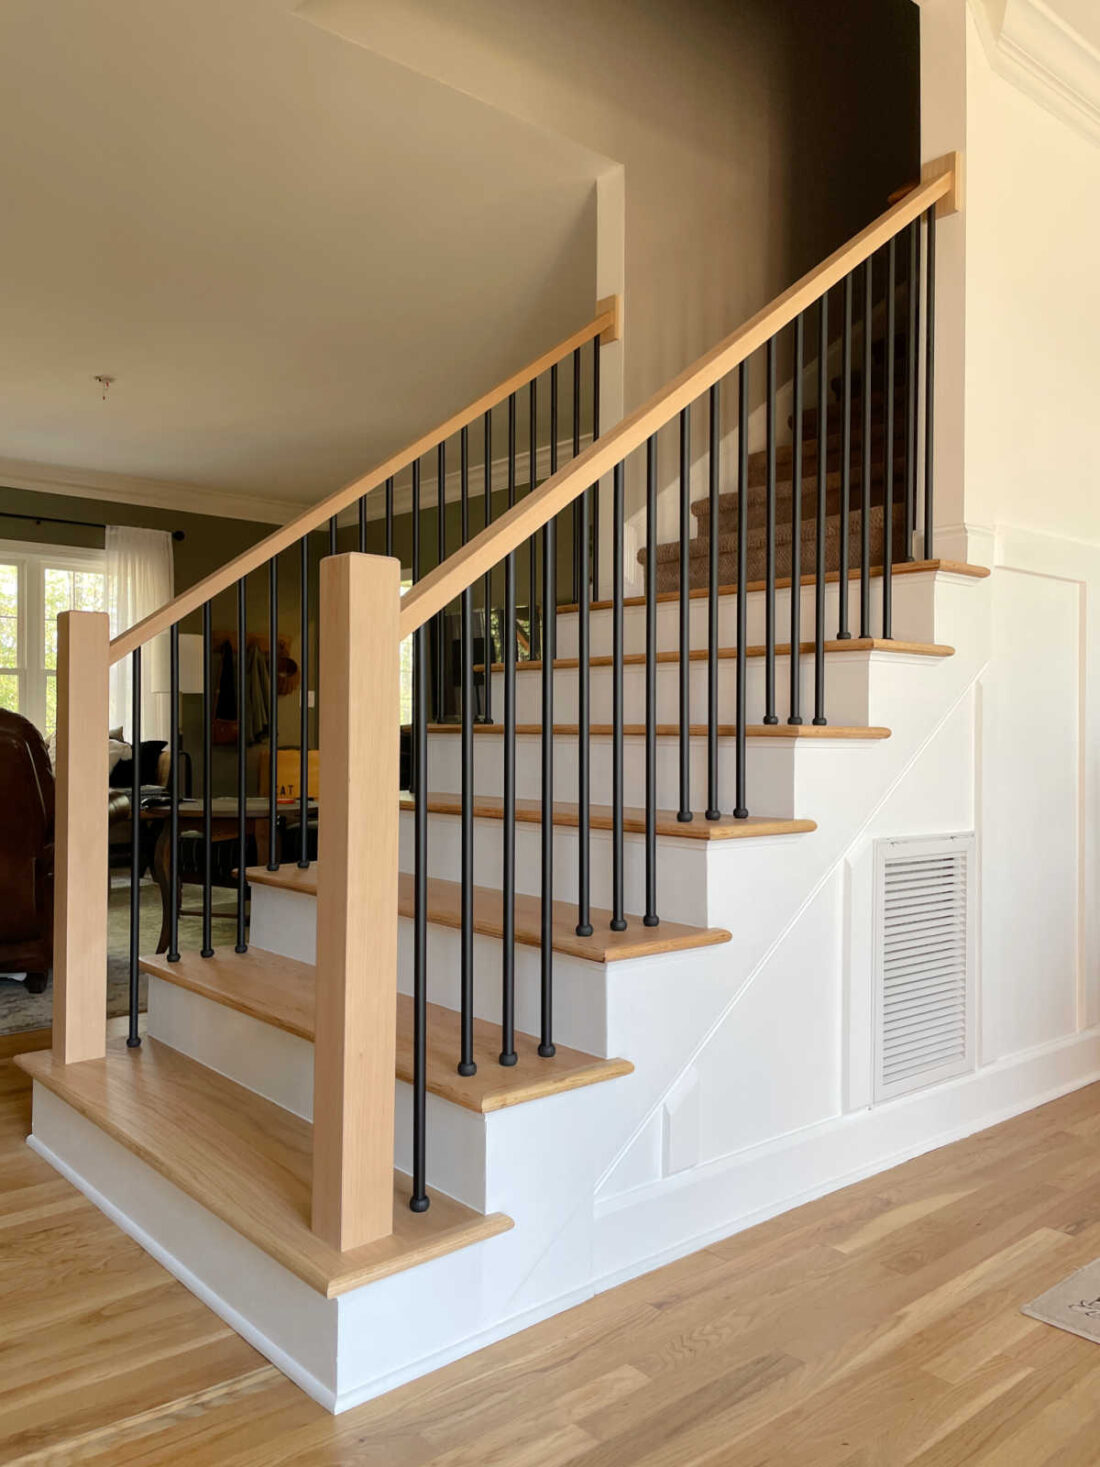
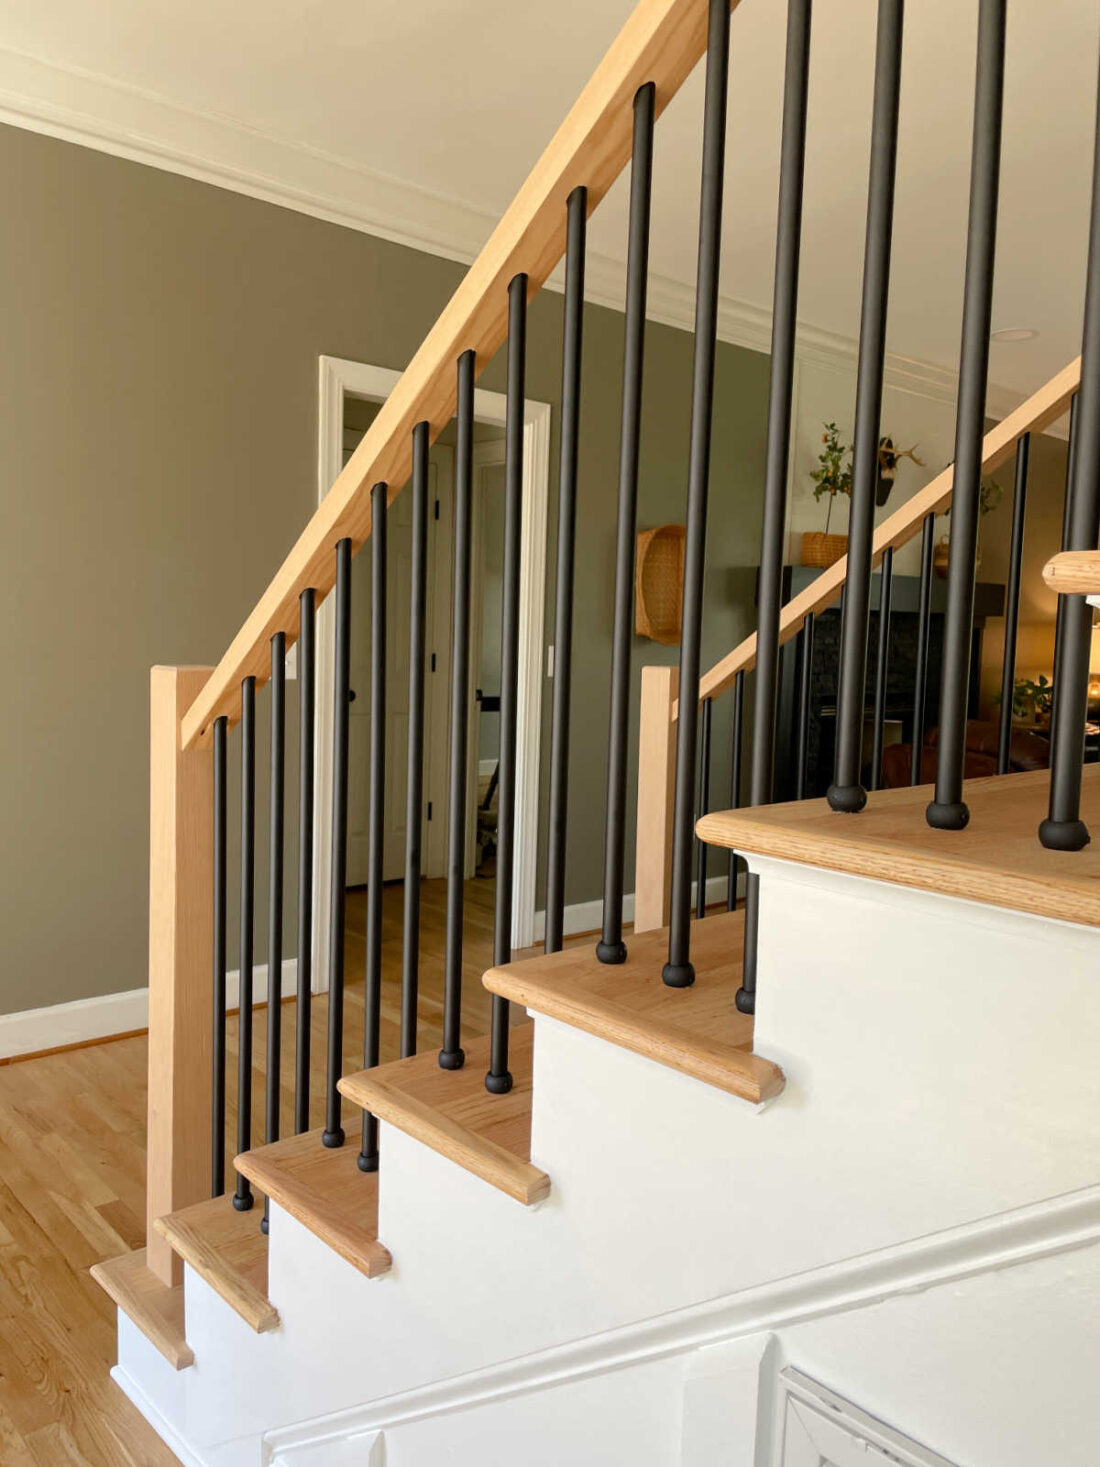
Be sure to keep your overall home style in mind when designing your new staircase. The clean lines of the newel, handrail, and wrought iron update the home while the same wood tone and traditional white paint detail keeps it classic.
Staircase makeover replacements
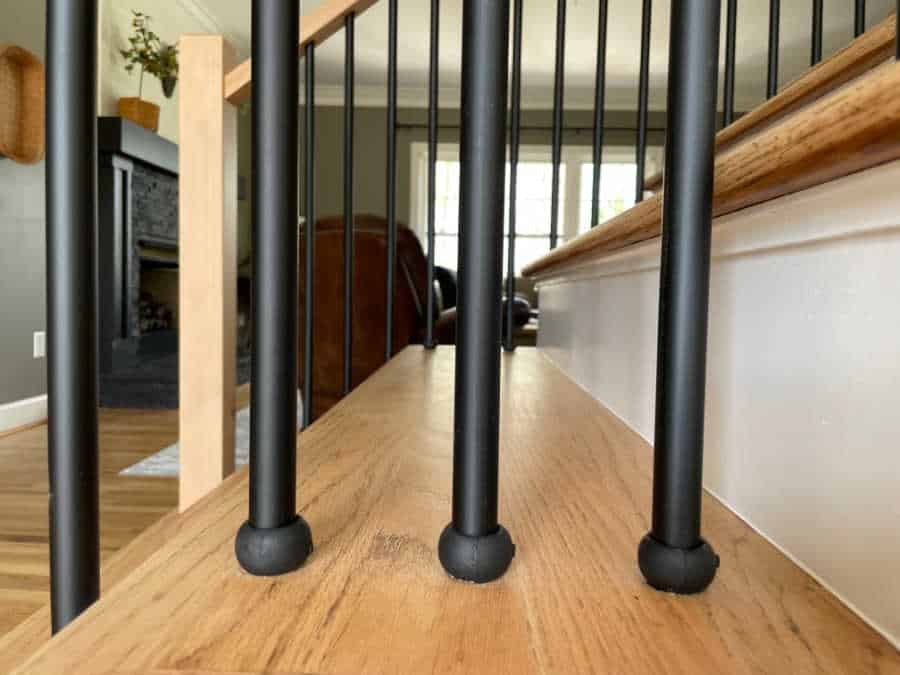
- Iron balusters (#40-830 in flat black)
- Iron baluster feet (#30-861 in flat black)
- Wood for newels and handrail bought at local lumber yard
- Starter step tread
The steps
1. How to demo staircase
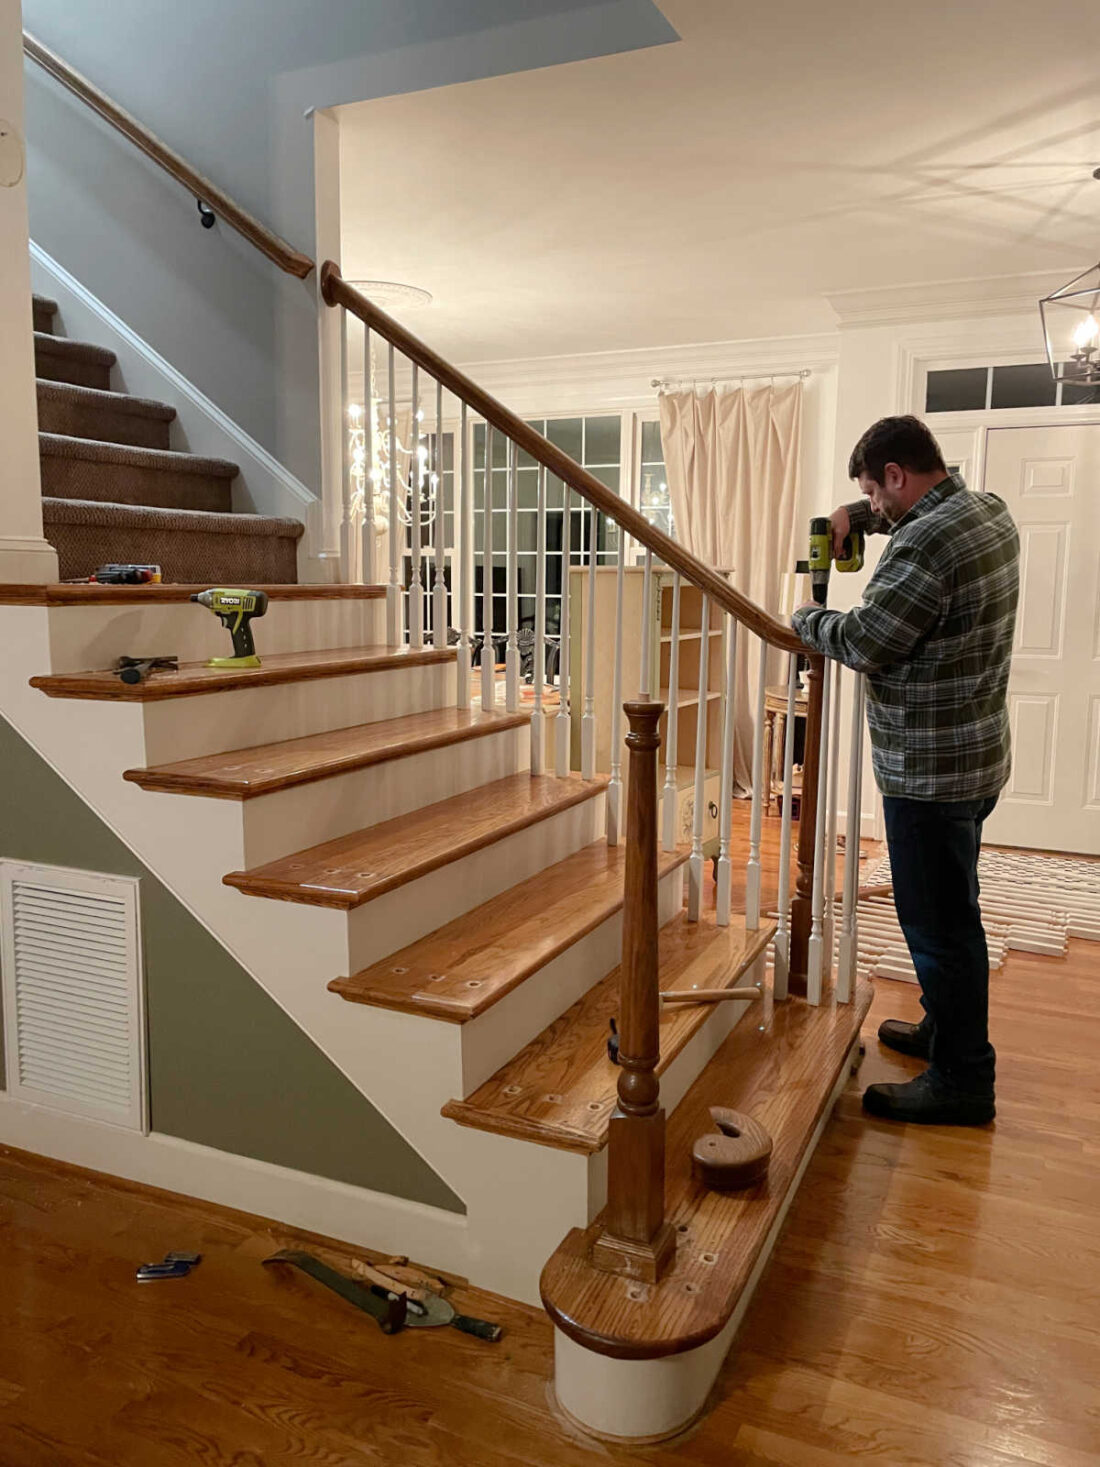
The first step was to demo the existing staircase. We removed the handrail first, then all the balusters (also called spindles) and lastly the starter step.
Tools:
- Rubber Mallet
- Pry Bar
- Hammer (to hit the pry bar)
You will use the pry bar to loose the spindles from the base/steps and also to get the bottom curved step up.
To remove the handrail use a rubber mallet to literally hammer it off. We hit ours from underneath. If you have wooden spindles you could cut those with a hand saw to loosen the railing. This was an afterthought for us.
We should have visited YouTube before we started demo. For most people I would recommend sourcing materials before demoing and tearing anything away. Especially right now with supplies hard to come by.
We needed to demo before we ordered supplies in order to have our floors refinished. Once we decided to redo the staircase we had to get the rails and balusters off. Removing all of that made it much easier for the flooring company to sand the treads. Yes, they thanked us.
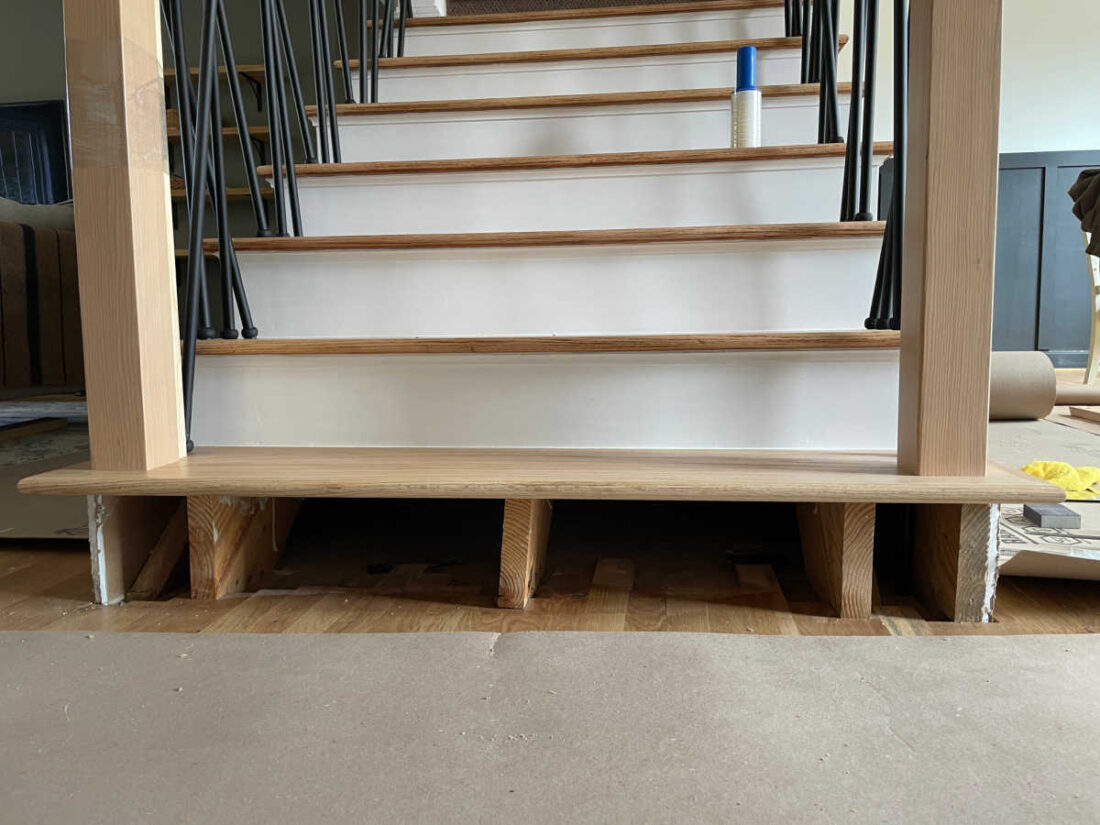
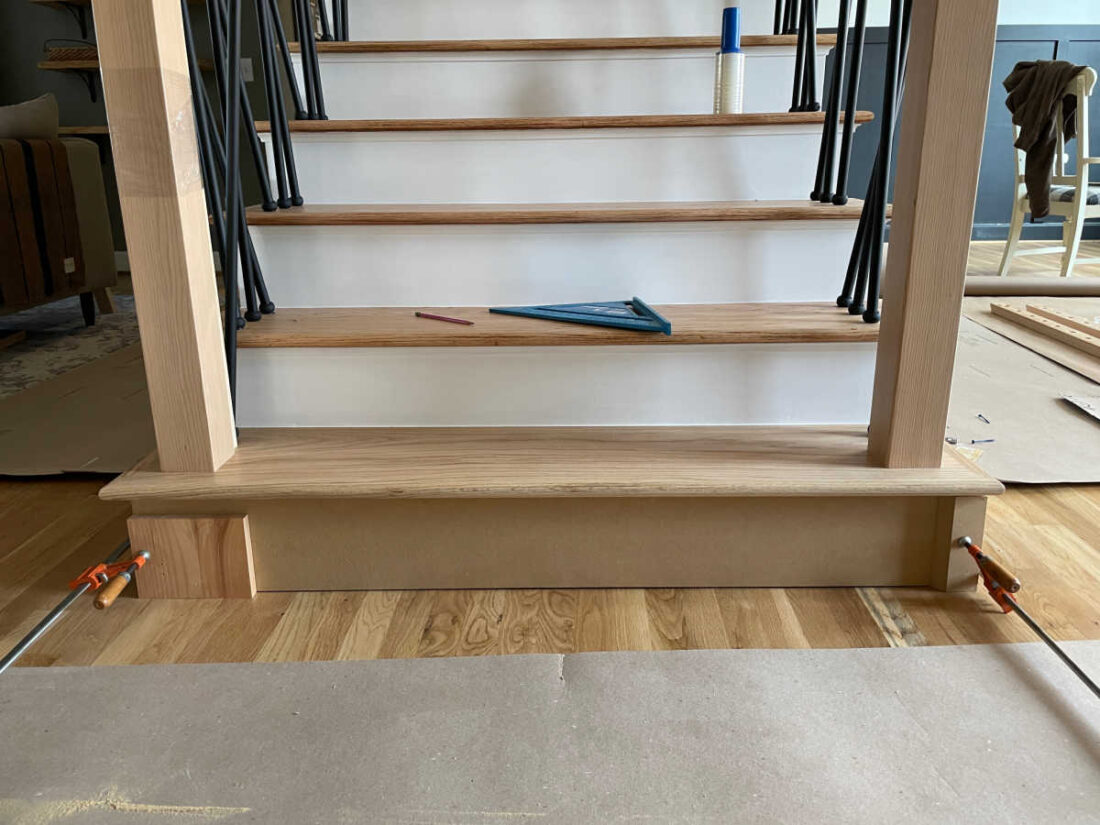
2. Add new tread
We purchased a custom ordered quality tread to match our existing oak floors. Our stair treads are a custom width and have a double return. Make sure to get your measurements exactly right because you can’t return a custom tread. It was probably the easiest part of the stair makeover. The new tread was installed before the floors were refinished.
- level the tread
- add wood glue to secure
- nail tread place with finishing nails
- wood putty the nail holes

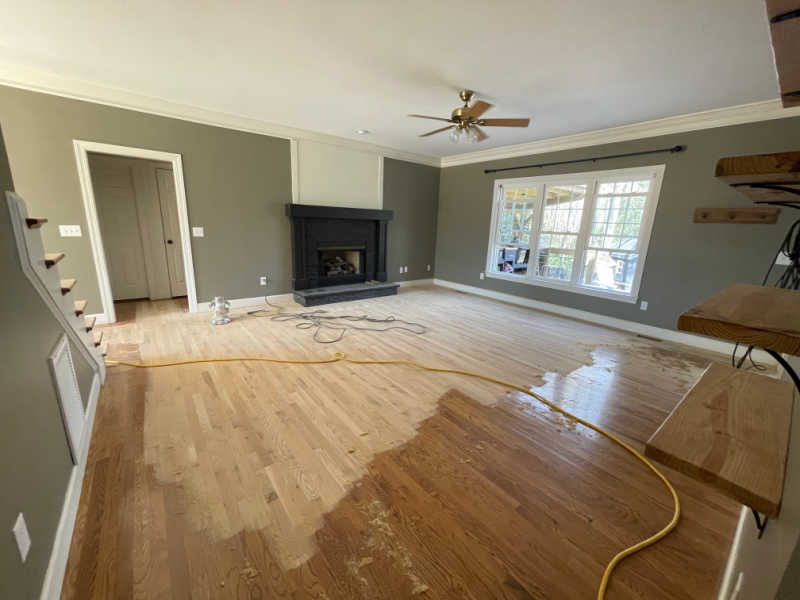
3. Floors refinished by professional
We are very happy with how the floors look now. A project worth having professionally done. Saved us so much time.
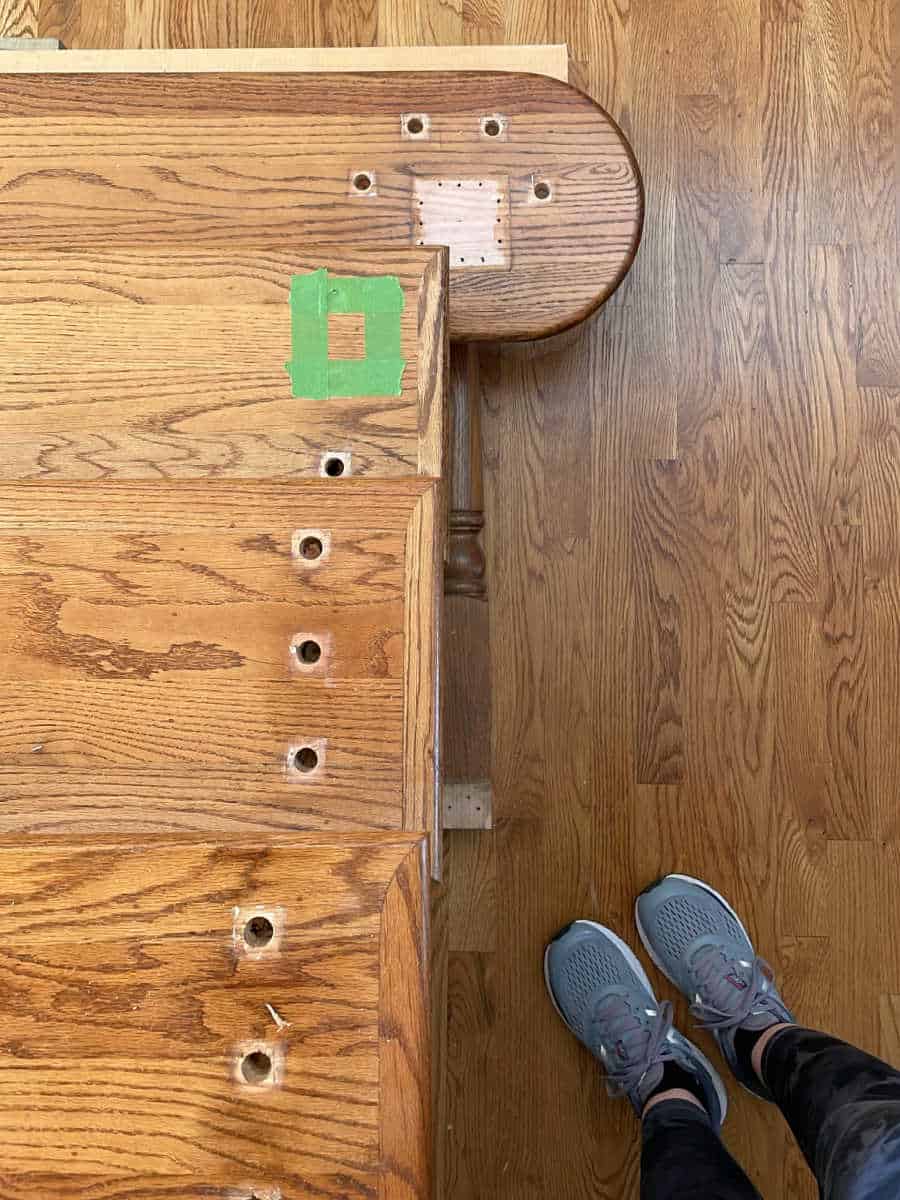
4. Drill correct baluster holes
Our spindle holes needed to be 3/4 inch but were a bit smaller than that. Using a 3/4 inch drill bit we created a jig. The jig was helpful for two reasons.
- One, if you try to drill in an existing hole the drill bit is going to walk on you and cause damage. The jig holds the drill bit in place.
- Second, it allowed us to make sure we centered over the hole to get it exactly right.
The jig was definitely helpful for drilling the new holes on the starter step stair tread.
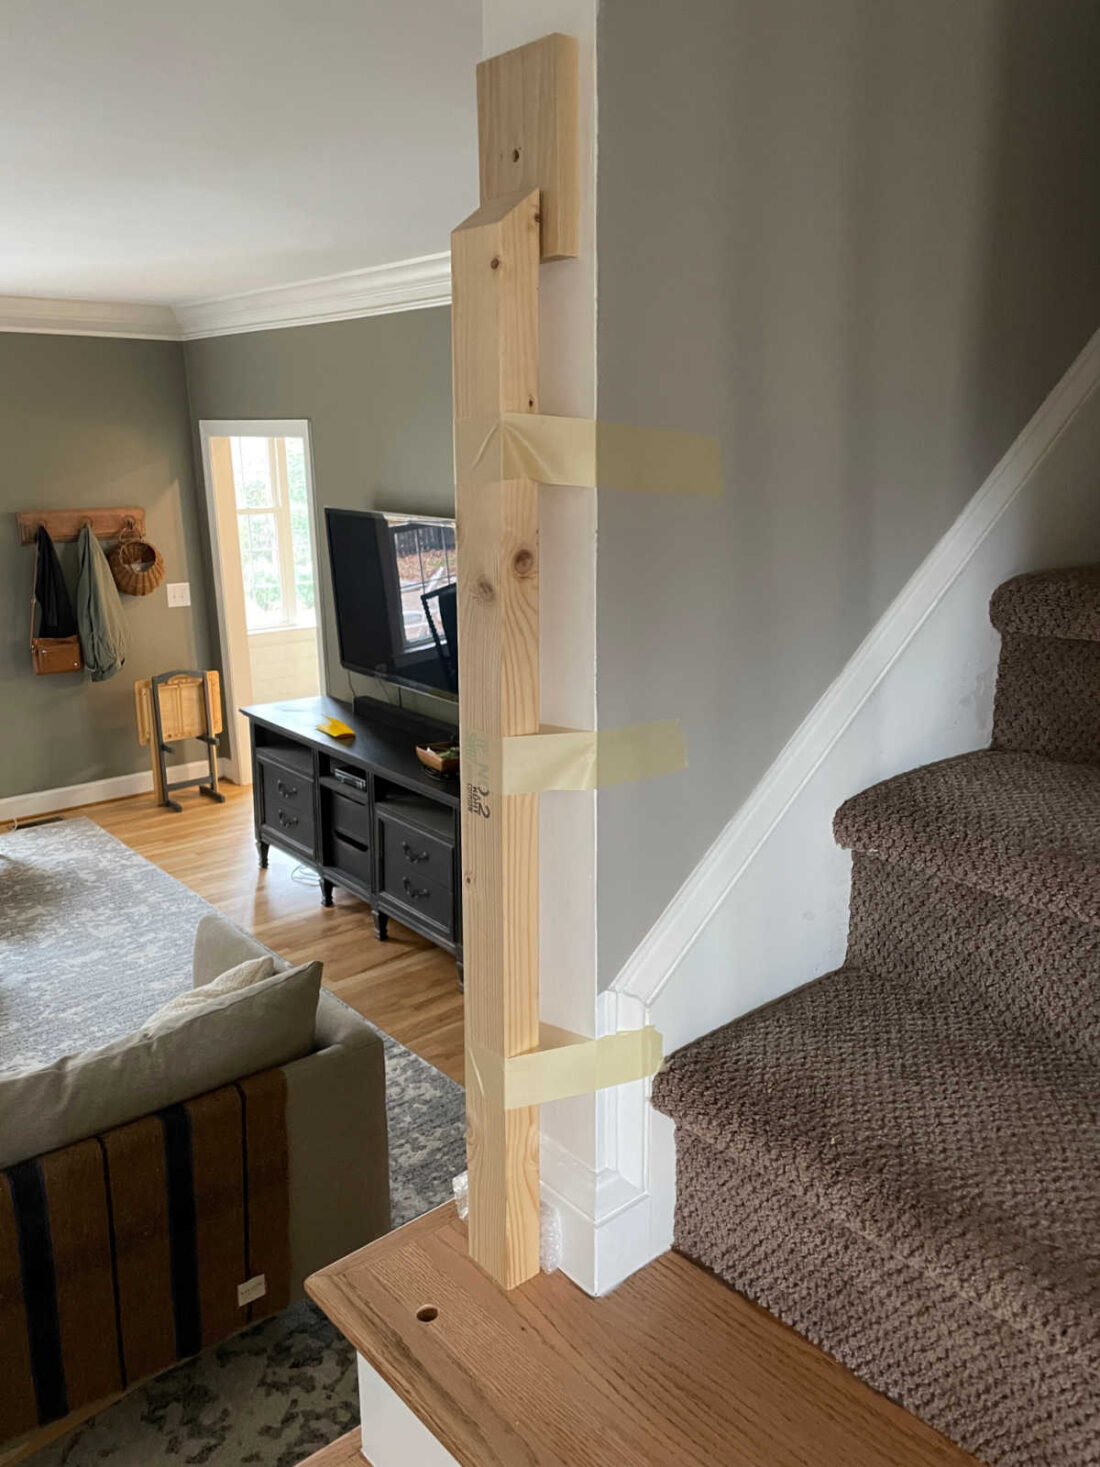
5. How to build custom newel post
There are many styles of newel post that are available for purchase. We wanted a basic post design and decided to mill our own. A local lumber yard had beautiful choices of wood and we bought a fir 8 foot 4 x 4 board. The lumber yard cut this in half for us. Once ready, we cut it down to the size needed (39″).
The newel post detail includes a chamfered edge with a router bit on all four sides of the top edge. Be sure to use a sharp bit and take your time as you don’t want the wood to chip. We did use painters tape to help with any chipping.
Practice the chamfered edge for the custom newel post on a scrap piece of wood first. Don’t want to mess up.
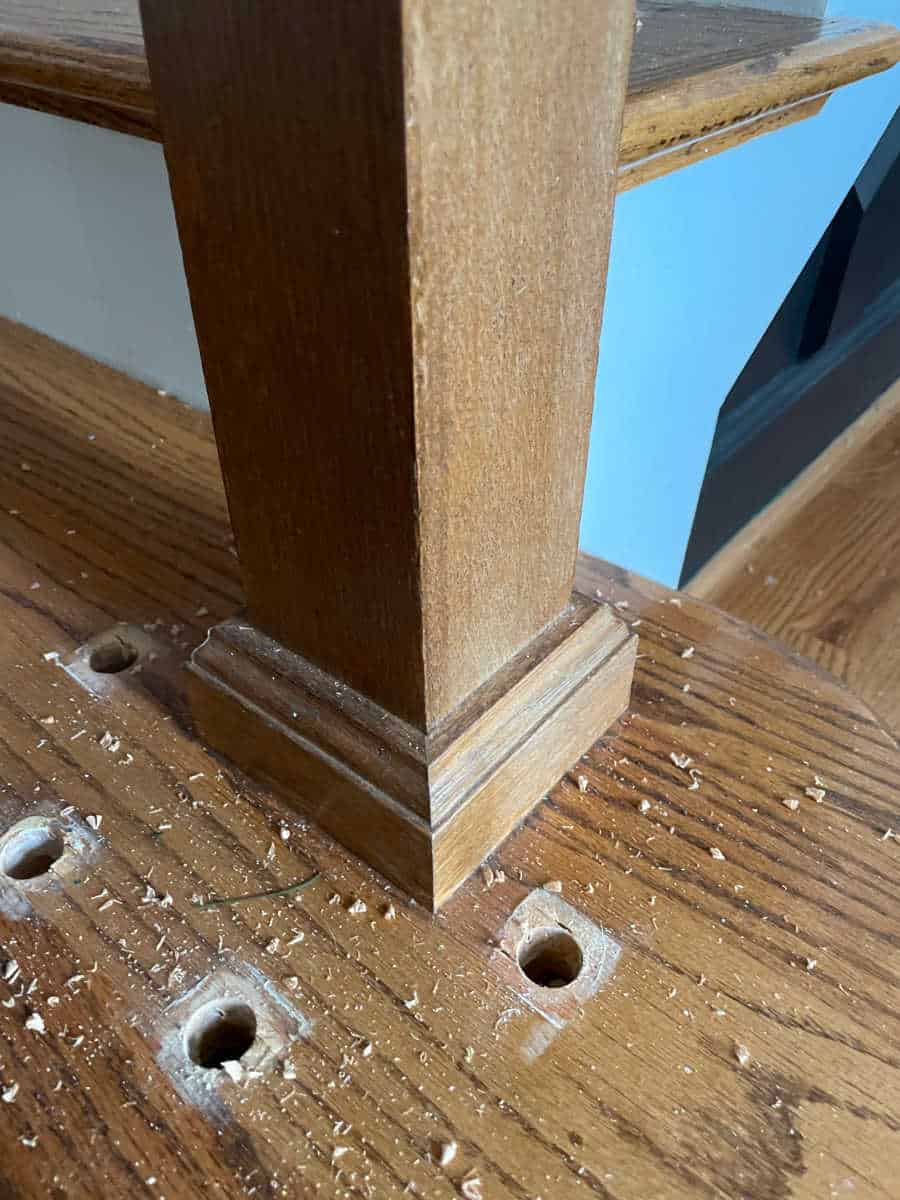
Once sanding was completed, the newel posts were sanded smooth. Marking an X pattern on the bottom a pilot hole was drilled dead center. A 3/8 in.-16 x 4 in. stainless hanger bolt that was installed into the bottom of the post.
A matching size hole was drilled into the new stair tread so the post could be mounted. We snugged up the nuts on the post but didn’t make super tight as this was temporary to be able to mount the handrails.
- 3/8 in.-16 x 4 in. Stainless Hanger Bolt
- washer and nut both stainless
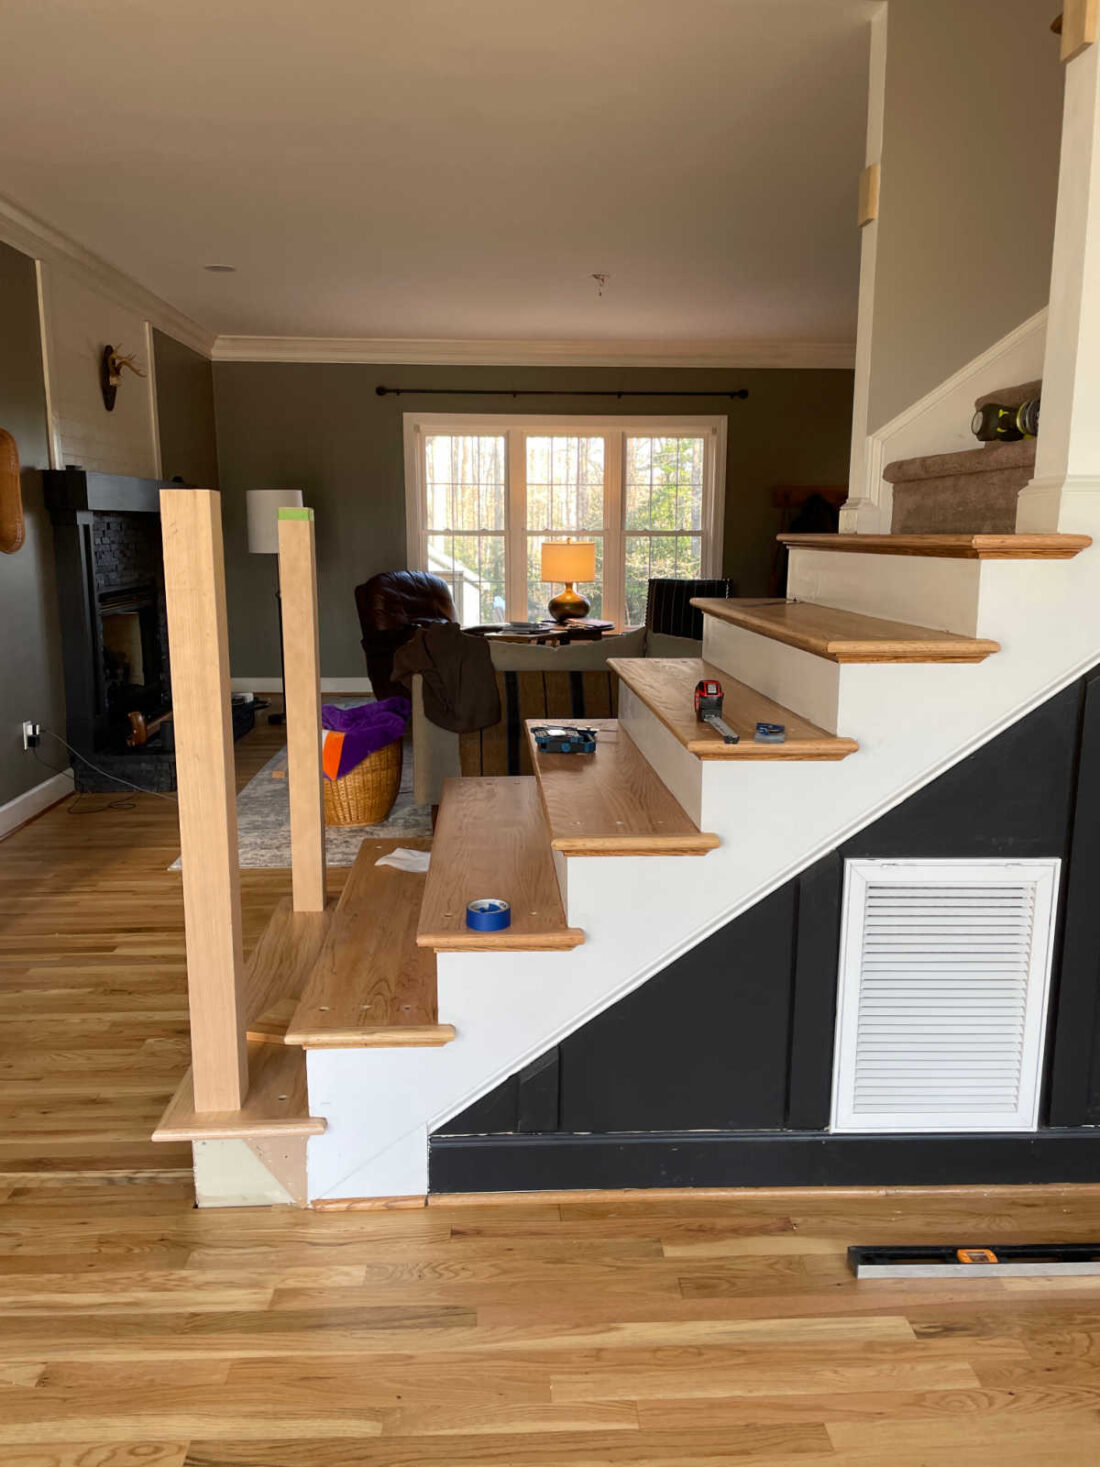
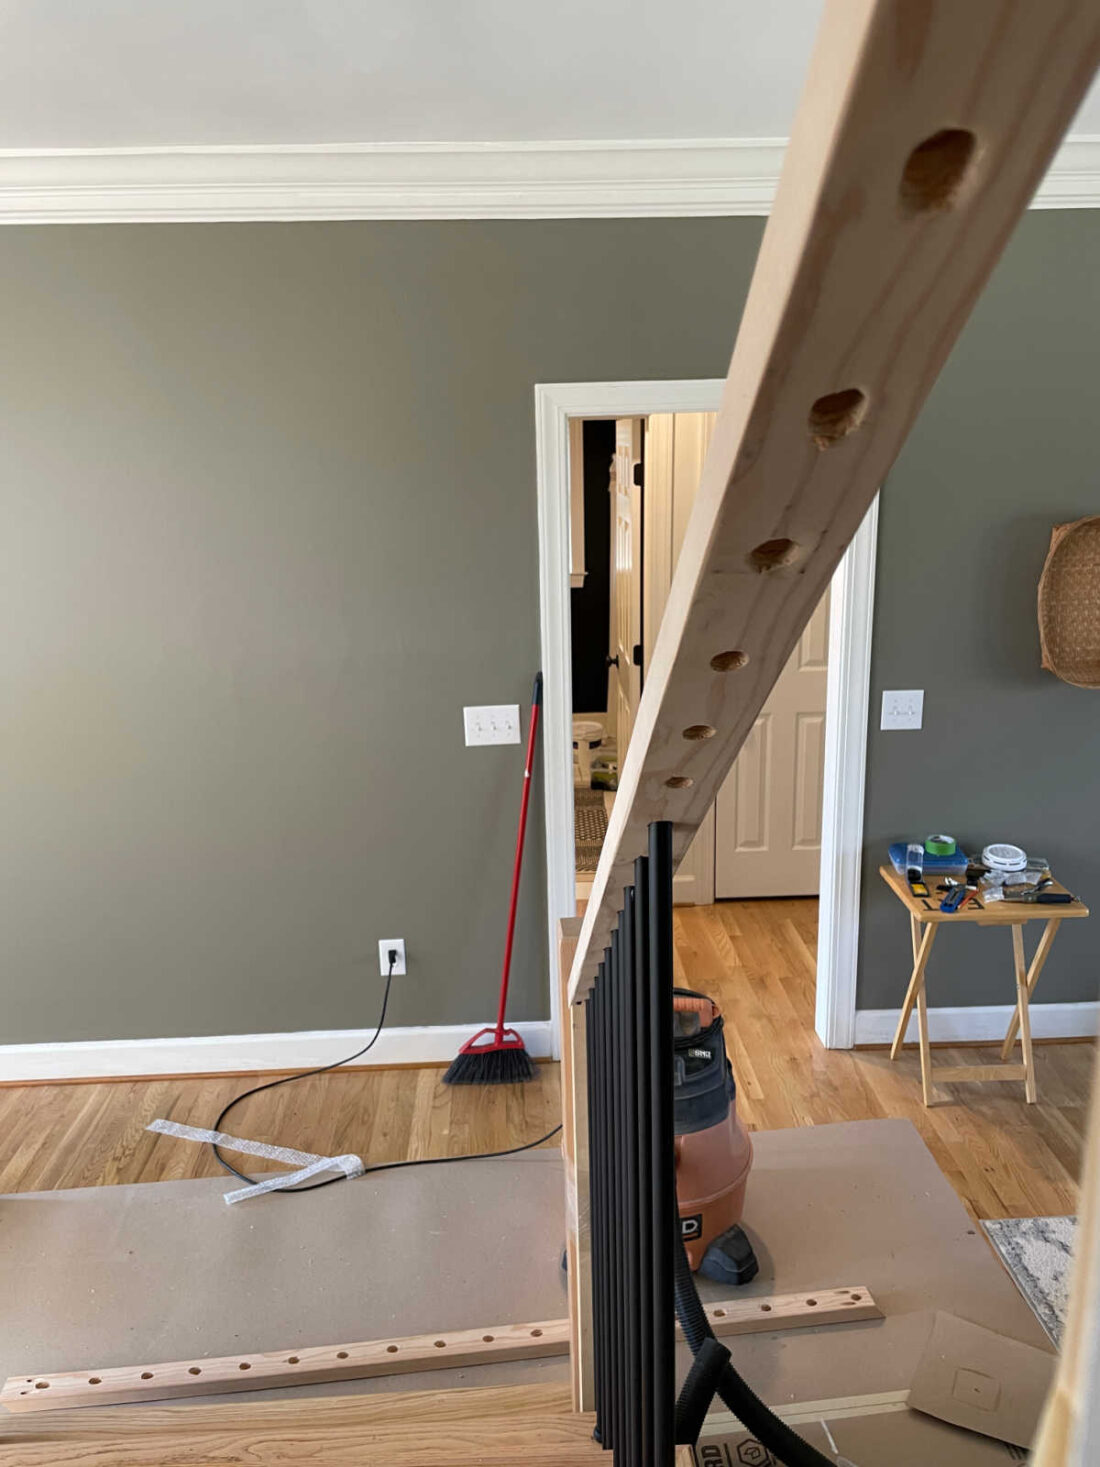
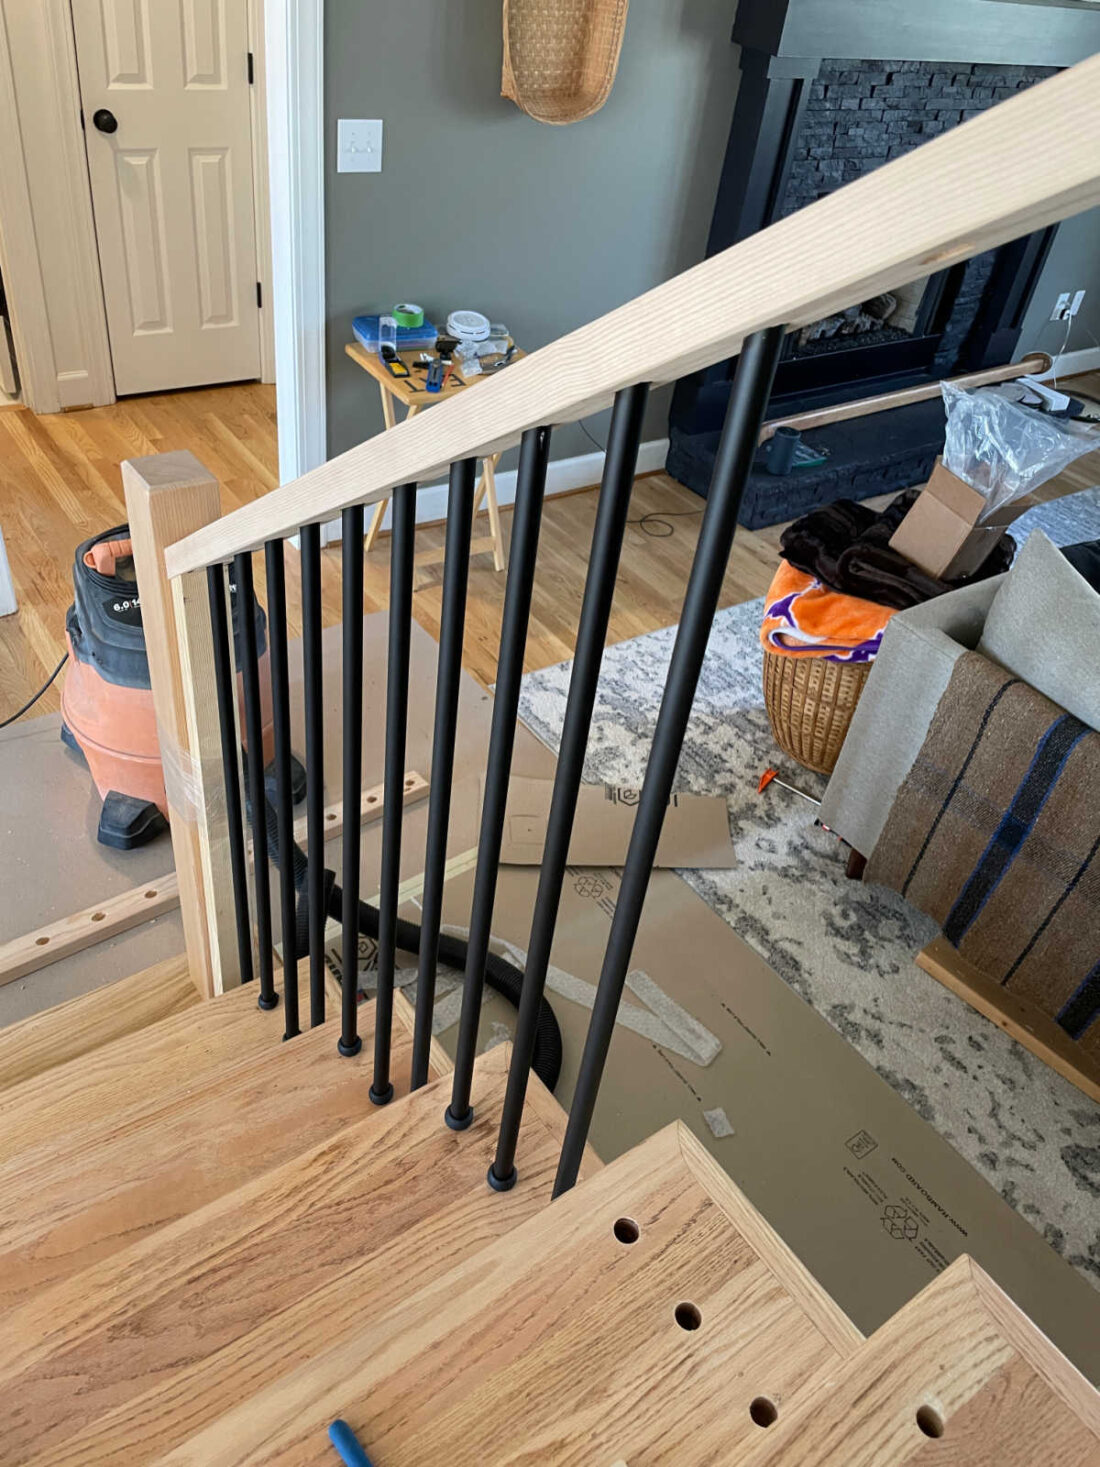
6. Build new handrails
At the same lumber yard we purchased a 2x6x8 kilned dried fir board. We had the lumber yard rip the board in half length wise on their table saw. Saved us time and they did it for free.
This left one side of each board with a straight cut versus a rounded edge on the non cut side. Take a sander to the edges of the cut side and round off to match. This is the same sanding technique I did on our DIY rustic wood shelves.
Laying the board on the stairs we were able to mark the finished length and get the correct angle to cut each end. Using two 2x4s cut to correct height and angles to be able mount the handrail at the correct height.
- Cut two 2x4s to correct height and angles to temporarily hold up the handrail as you mount
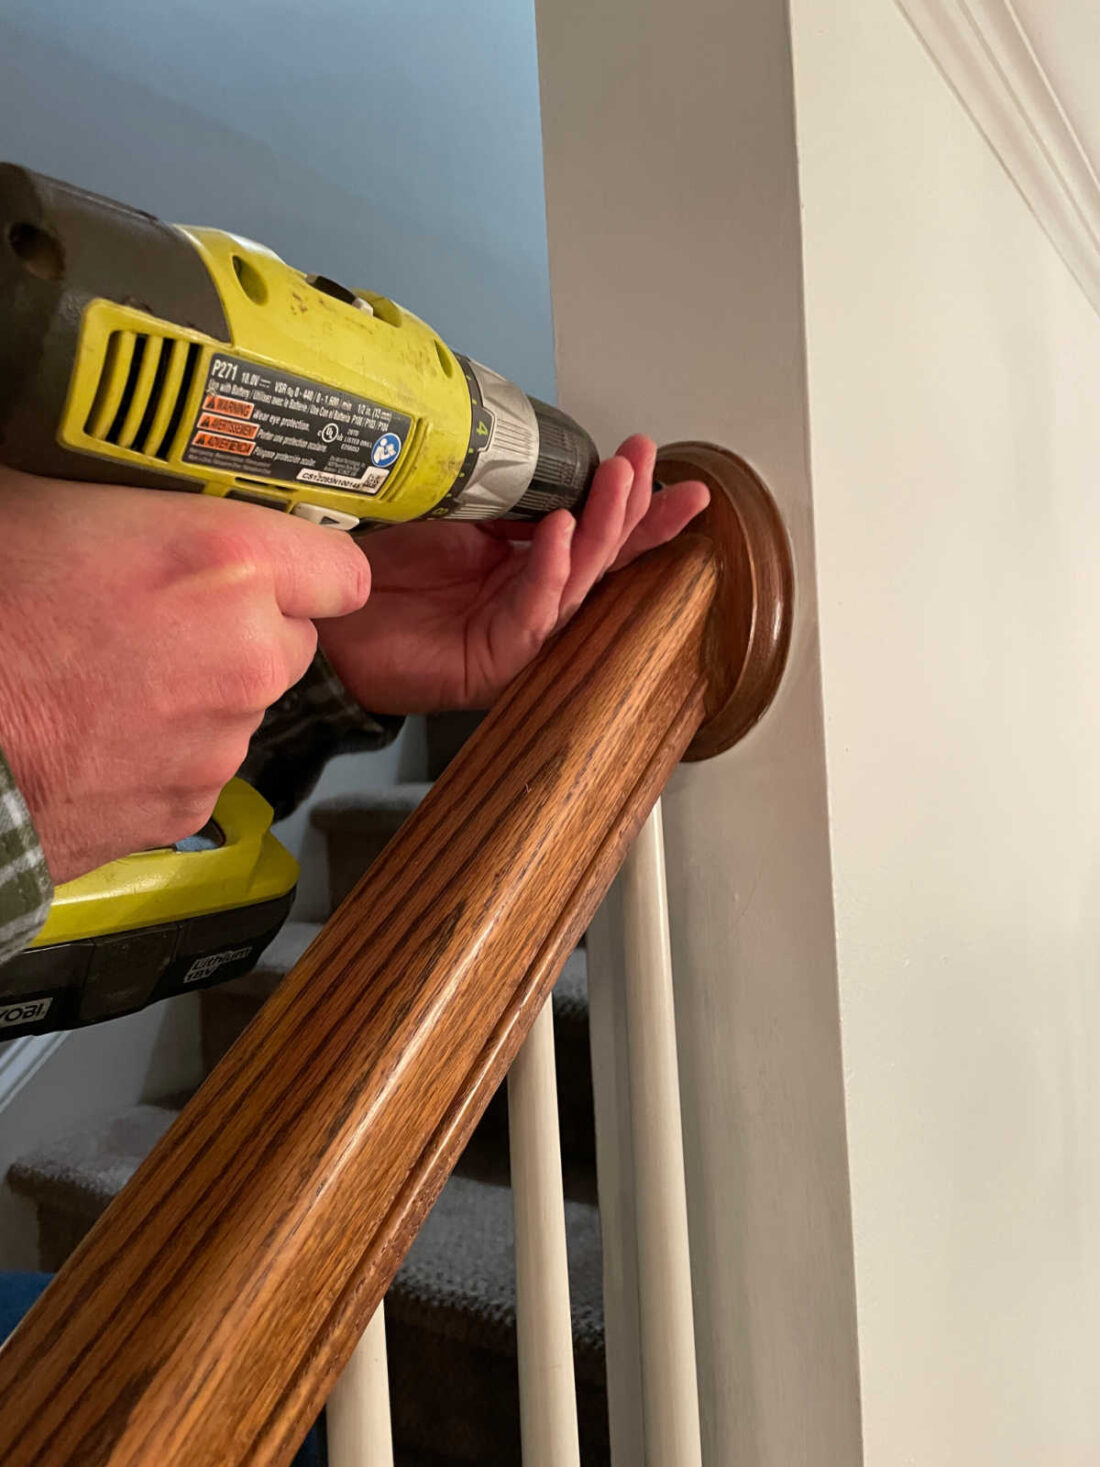
- In order to mount the handrail pocket holes were cut with a Kreg jig underneath handrail to mount to top wall and bottom newel post.
- Once mounted, baluster holes were marked with laser and a center marking tool.
- Using a paddle wood bit holes were drilled into the handrail for the balusters. You have to start the drill at an angle then move to 90 degrees to get straight up and down. This is critical so take your time. I marked the drill bit with tape so I did not go through the top of the handrail.
- Once completed the handrail was removed and finished.
- Bought 1×4 and made square mount for top of stairs.
The custom newels and handrails made a huge difference toward the modern staircase makeover.
7. Add starter step riser trim work for new tread
This part just required measuring and cutting new MDF. Of course, if your risers are stained wood you will need to plan accordingly for those supplies. We used MDF to match the painted surface we were keeping on the rest of the staircase.
Be sure to leave the front riser off until you have screwed your newel post into place and have then secured.
8. Fresh white paint
Keep the painting to the last possible time in order not to scuff anything. I didn’t want to take a chance of messing up the fresh white paint when the stairs and floors were being done so I waited.
I did however want to paint them before the new iron spindles went up. It is terribly difficult to paint stair risers once the balusters are in place.
Be sure you know if you have oil based or water based paint. Trim is notoriously painted with oil based paint by professionals.
9. How to install iron balusters
- cut iron balusters to length
- slide baluster shoe on to the end
- place baluster into each tread hole
- attach handrail
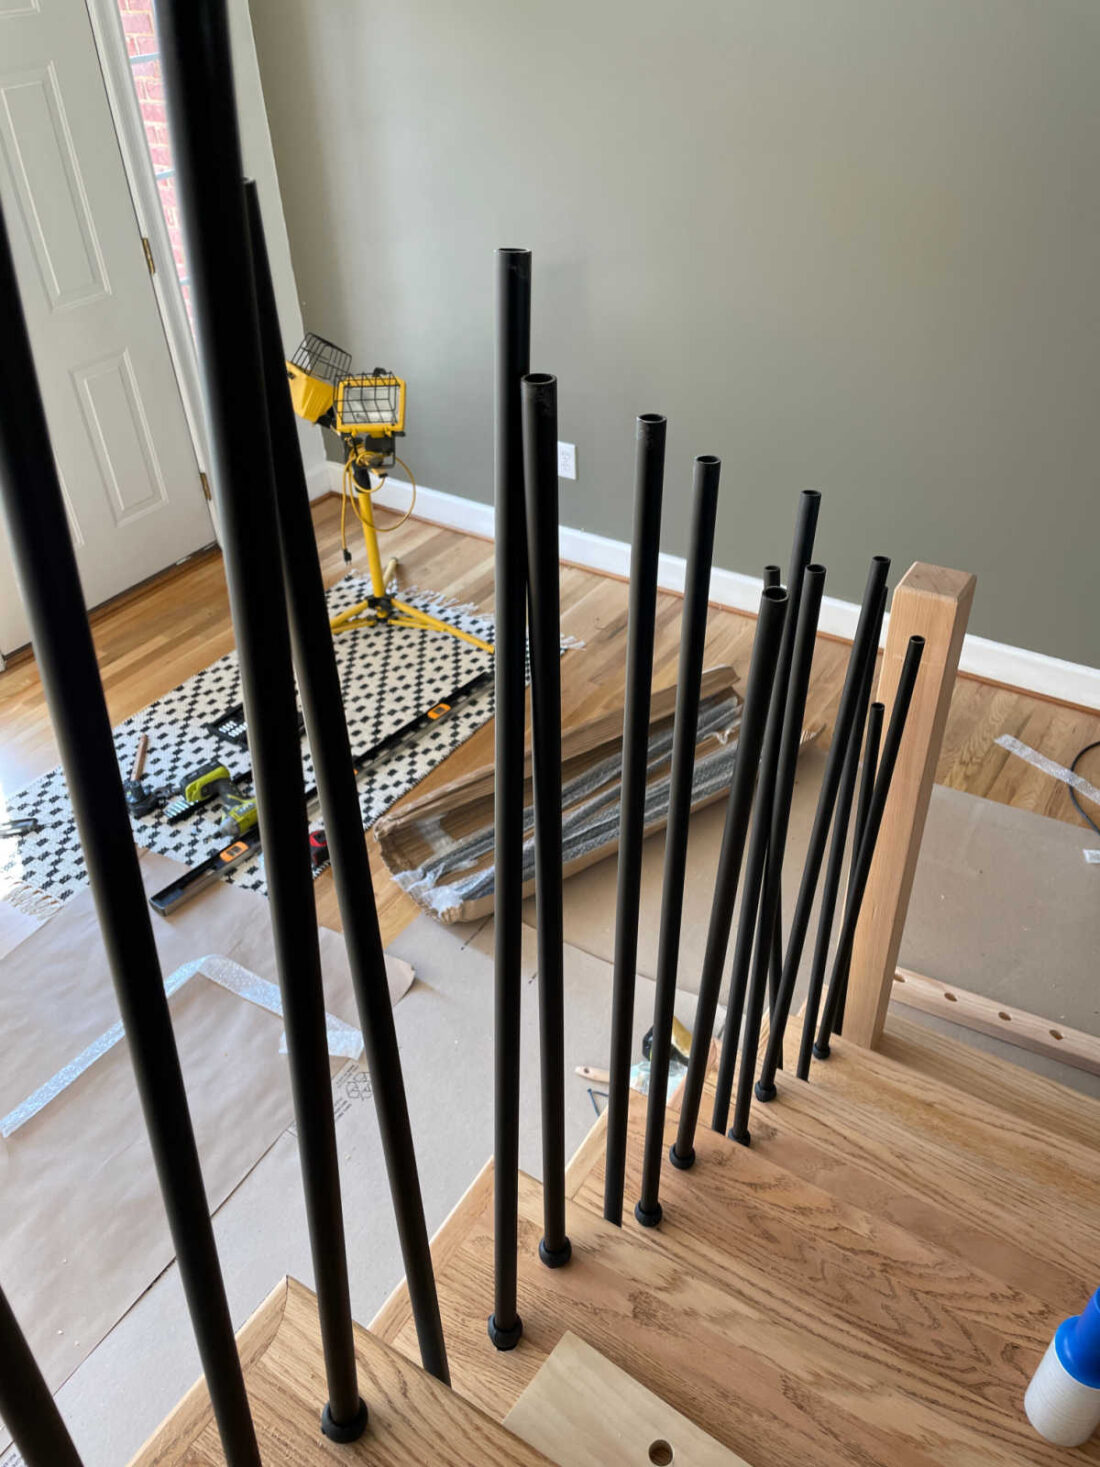
Iron balusters came 49″ long. We needed 37″ so each one had to be cut. Measure from the bottom handrail to the top of the stair and add 2″ to account for depth of the top and bottom hole. The 3 rails per step were each different lengths. However, the 3 measurements were the same for each additional step. I used a jig saw to cut each one.
Wear safety glasses and put something protective over the iron side you plan to keep. This will protect your iron from being scratched by the saw base. Plastic wrap (what we used) or painters tape will work. The key is to have a sharp blade and let the saw do the work.
Don’t cut the iron spindle in the house as metal shavings go everywhere.
Once the iron baluster are cut to the correct length attach the baluster shoe to the bottom then install each of the balusters into the correct step hole. You will tighten the baluster shoe as a final step.
The handrail was put back on after the balusters were in place. The balusters were pushed as far as possible into the top hole of the handrail then tightened the baluster foot with an allen wrech (also called a hex key) to hold it in place.
10. Seal new handrails and newel posts
Seal the wood of the newel post and handrails once installed. Keeping with the matte finish similar to the floors a clear matte polycrylic was applied using this paint brush.
More Home improvement posts:
Stairs makeover Cost
- Iron balusters (32) $350 plus $150 shipping
- Shoes for iron balusters (32) $85 plus $15 shipping
- Wood for newel and rails $120
- Tread $80 plus $40 shipping
- MDF $12
- Wood board blocks $8
- Paint $40
- Clear sealer $20
- Router bit $30
Staircase Makeover Summary
- Demo
- Add new starter step tread.
- Floors refinished by professional.
- Drill out baluster holes to correct size.
- Add custom built newel post.
- Cut and create new handrails.
- Build new squared off riser for lower tread.
- Paint white areas with fresh paint.
- Measure, cut and install iron balusters.
- Seal wood newel and handrail
I detailed the steps we took in order in the blog post but for the demo we used a pry bar to lift the curved step off. Then removed the curved box before building a new sqared off one.
Hello! Can you provide the steps you took to remove the curved part of the bottom step so it could be a straight tread like the ones above?
We did soften the edges of the handrails by sanding and they are easily grasping width. Also, the handrail is attached exactly as it was when the home was built and passed inspection. We didn’t change that part. There is still a handrail for the entire span of the stairs. Thanks for your input.
First, it may all look great but your handrails don’t meet the building code for that profile. Your handrail is not a “graspable” handrail.
Second, the handrail on the right must be continuous from the top of the stairs to the bottom of the starting step, no breaks allowed. Fastening the lower handrail to the wall and starting a second handrail does not meet code. You didn’t do your homework.
It could become an issue if somebody fell. That somebody breaks a leg and decides to sue. Then the lawyers show up and start taking pictures. Hope you have a good homeowners insurance company
Hey! I linked the company in the blog post, Custom Iron Works. Our balusters are the hollow steel, round 3/4 inch #40-830 The shoes are #30-861 Both are flat black
I would love to know som information about the balusters and shoes suc has sizing and where you bought them.
We didn’t use stain. We sealed the natural floor.
What color stain did you use on your wood steps and banister? I love it!
Hello,
Your stairs look great and thank you for sharing the process. Are the baluster shoes iron or plastic? Do you have the item numbers for the balusters and shoes from the website? I really like the simplicity of the round shoe. Thank you!
It was already there. You should be able to tell by looking at the wood boards pattern. If the floor was put down before the large bottom step the wood planks should go in and come out the other side. hope that makes sense.
Looks great! Was it the unfinished wood flooring under the decorative bottom step (where it was the oval parts that jut out)? Or did the floor guys have to put that in?
Hey, they are 3/4 inch
I also would like to know the width of your balusters please?
Also, if you used hollow balusters or solid. Thanks!!
I’m curious what width baluster you used for this? I’m torn between 5/8” and 3/4” but I want a nice slim look like yours. Thank you!